If you suspect your mobile device has been lost or stolen, take action as soon as possible.
In rare cases, you may still have your device but you can’t use it because your mobile number has been stolen through an unauthorised port.
How to report a lost or stolen mobile device/number
You can report a missing device or unauthorised port by giving us a call on 1300 997 273, or +61 2 9007 3023 if you are overseas.
Once you contact us, we can bar your SIM to prevent any unauthorised charges to your account. We can also block your device’s IMEI so it cannot be used with another SIM.
If your mobile number was ported or SIM swapped without your consent, we can reverse the port (and provide a new SIM if necessary).
More info
What should I do before reporting a lost or stolen device?
Before reporting a device as lost or stolen, try calling it. Someone may answer or you might hear it ringing. You should also check whether it’s been handed into your local police station.
You could also try to track the location of the device with:
- Find My iPhone (Apple)
- Android Device Manager (Android)
- My Phone (Windows)
What happens when you bar my service?
When we bar your service, your phone will be unable to make calls except to emergency services. If someone tries to make a call, a recording will advise them that call barring is active on the phone.
Barring your service doesn’t terminate your monthly plan. You can get a replacement SIM card to use with another device.
What if I find the device after you bar my service/block my IMEI?
If you find your device, give us a call on 1300 997 273 and we’ll unbar the service and remove the IMEI block. This can take up to 24 hours to come into effect.
How do I check if a phone has been reported lost or stolen?
You can check if it has been reported lost or stolen through the Australian Mobile Telecommunications Association website and entering the IMEI of the device.
What can I do to deter mobile thieves?
- Keep your mobile out of sight when you're out and about.
- Never leave your mobile unattended.
- Keep a note of your 15-digit IMEI number.
- Use your mobile’s security features such as an unlock PIN, security pattern or thumbprint scanner.
How can someone steal my mobile number in an unauthorised port?
Multi-factor authentication methods protect mobile users from most unauthorised ports. For example, a unique verification code is sent to the affected mobile number before it is allowed to be ported to a new telco or swapped to a new SIM.
A criminal typically needs access to your unlocked mobile phone or other identity documents to complete an unauthorised port. Today, it happens in rare cases of identity theft or fraud.
What else should I do if my mobile number had an unauthorised port?
- Contact your bank or financial institution ASAP and tell them someone might be committing fraud using your details;
- Change your passwords for important accounts like your bank, email and social media;
- Report any fraud to local police or the Australian Federal Police;
- Report any cybercrime involving identity theft or online fraud to the Australian Cyber Security Centre;
- Contact IDCARE on 1300 432 273 if you want help with identity crime or cyber security;
- Report the activity to Scamwatch.
Global Address Book allows up to 500 contacts to be uploaded and accessed by Standard, Premium or Cordless handsets.
Select one of the links below to jump to a query:
- Creating a Global Address Book file
- Error messages when uploading your .CSV file
- Accessing the Global Address Book from your handset
Creating a Global Address Book file
-
Log in to Frontier Portal. If you have never logged in before, please watch this video.
-
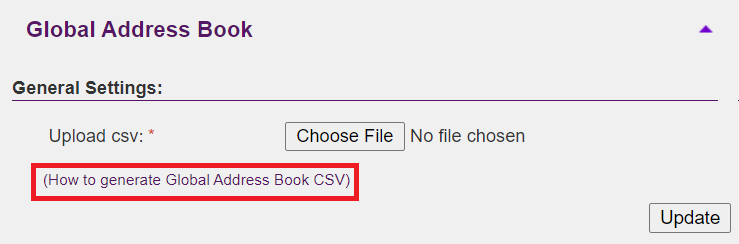
Select the arrow next to Global Address Book to expand this section.
-
Select How to generate Global Address Book CSV and save the file to a familiar location on your computer.
-
Open the sample CSV file using Microsoft Excel. Adjust the example entries and add more names and phone numbers as desired.
Note: Landline phone numbers must include the prefix for the area code, e.g. "02" for NSW. A maximum of 500 entries is supported.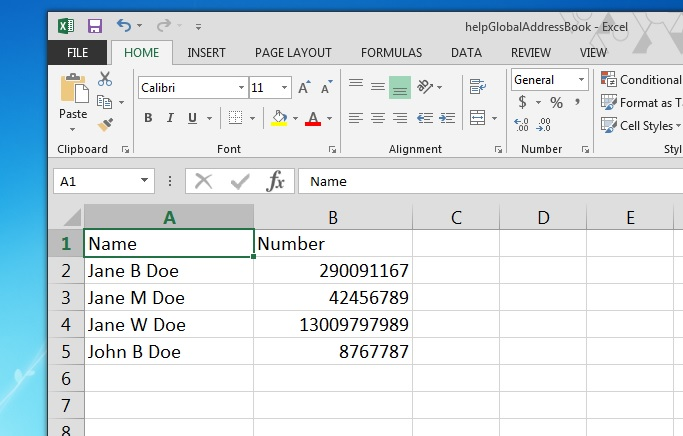
-
Save the spreadsheet as a .CSV (comma delimited) file.
-
Return to Frontier Portal. Under Global Address Book, select Browse.
-
Locate and select your .CSV file, then select Update.
Note: You can update an existing Global Address book file in the same way.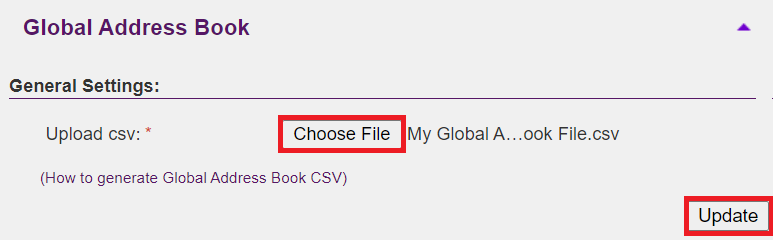
-
You must restart your BizPhone handset(s) after any changes in order to access the updated Global Address Book.
Error messages when uploading your .CSV file
If you encounter an error when uploading your file:

Please ensure that your .CSV file:
-
Has no more than 500 contacts in total.
-
Does not exceed 50 characters per Name field.
-
Contains no special characters i.e: .~!@#$%^&*()_+-=[]{}|\:'<>?,./
-
Contains no double spaces e.g. “John Doe”.
-
Contains no leading/lagging spaces in the Name field e.g. " Name" or "Name ".
Resolving these file issues should allow you to upload successfully. If you encounter an error you cannot resolve, please call us on 1300 769 691 for assistance.
Accessing the Global Address Book from your handset
Cordless DECT Handsets (W60P or W56P)
-
Press the OK handset key.
-
Use the Up and Down handset keys to find Directory, then press OK.
-
Select Network Dir.
-
Select GroupCommon.
-
Select the desired Name and Phone number from the Global Address Book.
Standard Handsets (T42S. or T42G)
-
Press the Directory soft key.
-
Use the Up and Down handset keys to find and select Group Common.
-
Select the desired Name and Phone number from the Global Address Book.
Premium Handsets (T48S or T48G)
-
Select Directory on the main LCD screen.
-
Select Group Common from the left-hand menu.
-
Select the desired Name and Phone number from the Global Address Book.
How do I modify features like Call Forwarding?
We have built a web interface (Frontier Portal) that allows you to access and modify features of your BizPhone service. Some features can also be modified using the handset and special codes.
What happens if my Internet connection stops working?
We recommend you to provide a backup phone number during the ordering process and the incoming phone call can be routed to the backup phone number if your Internet connection is offline. Outgoing phone calls via the service will not work if your Internet connection is offline.
Do I need a separate Internet connection just for the phones?
It is possible to share an Internet connection amongst your telephones and computers. Bandwidth is the capacity of your Internet connection. Your bandwidth will be shared between the calls you make from your BizPhone handsets and the regular traffic that is sent for Internet browsing and web applications. The more bandwidth you have, the higher the number of concurrent calls you can have without impacting voice quality and browsing or access to web applications. You may also need to look at increasing your bandwidth.
How fast does my Internet connection need to be?
Continuing on from the discussion of bandwidth in the previous question, we recommend a minimum of 100kbps of upload speed per concurrent call.
What equipment do I need for a BizPhone solution?
BizPhone runs through your Internet connection, and there is no additional hardware required. Your phones will also connect to an internal network, provided by a switch. If you have computers plugged into a switch already, the phone has a 'piggy back' function that allows the phone to be plugged into the switch, and the computer to be plugged into the phone. This means that you do not need more ports than you already have in your networking equipment.
What type of cabling is required?
How do I connect my computer and phone? Your new telephone will plug into your switch via a standard Ethernet cable. Your computer can be routed directly to the switch or can also plug into the phone. The advantage of this feature is that only one port and run of cable is needed to connect both your phone and computer.
Does the phone need its own power supply?
All of the BizPhone handsets come with power pack which plugs into a standard 240v wall socket. These handsets also have the Power over Ethernet (PoE) function. This allows the handsets to be powered via the Ethernet cable it is connected to. For this setup to work correctly, you must have a PoE switch installed in your business.
Can I connect my fax machine?
Fax is supported on a best effort basis only. You can order a BizPhone Line (ATA) plan and plug a fax machine into it, but we cannot guarantee that fax will always work on ATA, as it is a VoIP based service.
Can I dial 000, and does my 000 emergency address work?
Yes - access to the emergency services is still available. Please consider that as your BizPhone service can be used in any location that has a suitable Internet connection, the address recorded against your phone number that emergency services sees when you call may not match your current physical location. A caller to emergency services should always have access to their physical address to give to the operator.
What configuration details are required to be listed in the White Pages?
The details required are the Directory Usage Code and the Directory Listing Code.
What happens if I lose power at my business?
Your new handsets operate via a normal power adapter or via a Power over Ethernet switch. They require power to be used, and will not function in the event of a power outage.
However, if you provided a backup phone number at the time of order, your incoming calls will be routed to the backup number provided (Call Forward Not Reachable).
Do I need to be a TPG customer to purchase TPG BizPhone?
No, you are welcome to use another provider Internet service with our BizPhone solution. We would highly recommend choosing us as your Internet provider. Having both services through TPG means you have one number to call for an issue related to the Internet and BizPhone service.
Can I customise the recorded 'Music On Hold'?
Yes, the ability to upload or record your own 'Music On Hold' is enabled through the online portal.
What type of calls are included for free in my monthly line rental?
Each plan with TPG BizPhone includes all of your local, national, and mobile calls at no additional cost.
What happens at the end of my contract commitment?
At the end of your contract commitment, you are able to continue with your selected plan and access. If you wish to cancel the service, you will need to return the handsets.
Does the Customer Service Guarantee (CSG) apply to TPG BizPhone?
BizPhone customers waive their rights to the Customer Service Guarantee upon signup of the service. As this is a significantly discounted service (including free local, national, and mobile calls and low cost international calls) TPG is not able to provide the same CSG as it would with a traditional landline telephone service.
Does TPG have a fair use policy?
Yes, TPG does have a Fair Use Policy that applies to BizPhone. The policy restricts usage to a normal business use service.
Does TPG BizPhone support multiple sites or physical locations?
Yes, TPG BizPhone support multiple sites or physical locations as part of same BizPhone order.
Am I able to upgrade my handset?
Yes, you can upgrade your handset to a different model.
What is the process for returning the old BizPhone handset when I change my BizPhone plan?
The TPG equipment retrieval team will initiate the collection of the old equipment by sending the consignment note to you and organising the courier to pick it up.
Do I need to do anything on the portal to activate the new handset (upgrade or downgrade) or is it simply plug and play?
You will need to plug in the handset once you receive it and then call the BizPhone provisioning/activation team to activate the new handset against your existing service.
How do I reconfigure the phone if an employee leaves the business?
The group Administrator can log into online portal to change the first and last name details of that user.
Does BizPhone allow call recording for Training and Development purposes?
TPG BizPhone will not allow this feature. It is being considered for future releases of the product.
What is the maximum monitored users in the Busy Lamp Field feature?
The maximum limit is 50 users.
What is the maximum monitored users for Receptionist Basic vs Advanced?
For Basic, it is a max of 30 monitored users and for Advanced it is 200 statically or 100 dynamically monitored users.
Is the Speed Dial 8 feature available on the IP DECT Phone? What about Softphone?
Yes, Speed Dial 8 is available on both the DECT Phone and the Softphone.
Is the Auto Attendant audio file format restricted? Are there any guidelines for this?
Yes, there is a specification for the Auto Attendant audio file format, which you can find in the TPG BizPhone User Reference Guide.
Do I need to have SIP port 5060 open for both TCP and UDP?
TCP is our default protocol and therefore TCP port 5060 should always be opened, where an UDP is optional, but it is also recommended that it is open; i.e. if TCP passes the BizPhone firewall connection test and UDP fails the service should still work.
Is the Busy Lamp Field feature available across all different handsets?
The Busy Lamp Field feature is not available on the Cordless IP DECT (W52P or W56P) handset. It is only available on the Standard (T42G/S or T43U) and Premium (T48G/S or T48U) handsets
Is the Voicemail to Email feature available on TPG BizPhone service?
Yes, the Voicemail to Email feature is available and the email address will be captured at the time of ordering. You can also modify this feature through the online portal.
Can I add extra lines to my BizPhone handsets?
No, TPG BizPhone is 1-to-1 service and you can only have 1 phone number or line on each handset.
Is there video capability in development for BizPhone?
No, video conferencing is not on the roadmap for BizPhone
Where can I download the Mobile App?
Through the Apple App Store or Android Google App
Are calls that are initiated from the BizPhone Mobile App charged to the BizPhone user (i.e. not to the user’s mobile carrier)?
Calls that are made from the BizPhone Mobile App are charged to the BizPhone user at the same rate as those from the desktop phones.
Note: if WiFi is not on or available at the time of making call, it will use the mobile carrier’s data plan.
Can I choose the number range for my BizPhone service?
No, you can only specify the number range size on the order and we will assign the range randomly from the available numbering pool.
Can I add more than one user as BizPhone admin?
Yes.
The following types of call transfers may be used on a BizPhone Standard, Cordless or Premium handset:
- Blind Transfer - Transfer a call directly to another party without prior consulting.
- Semi-Attended Transfer - Transfer a call to another party whilst the target transfer phone is ringing.
- Attended Transfer - Transfer a call to after consulting with the receiving party.
Select one of the links below to jump to a query:
- Call Transfer on Cordless Handsets (W60P or W56P)
- Call Transfer on Standard Handsets (T42S. or T42G)
- Call Transfer on Premium Handsets (T48S or T48G)
Call Transfer on Cordless Handsets (W60P or W56P)
Blind Transfer
-
Press the Options soft key during a call, then select Transfer.
-
Enter the number you want to transfer the call to.
-
Press the Transfer soft key to complete the transfer.
Semi-Attended Transfer
-
Press the Options soft key during a call, then select Transfer.
-
Enter the number you want to transfer the call to. Note that this selection may be done using the Directory soft key > Local Directory if desired.
-
Press OK or the handset's Call button to dial out.
-
When you hear the receiving line ringing, press the Transfer soft key to complete the transfer.
Attended Transfer
-
Press the Options soft key during a call, then select Transfer.
-
Enter the number you want to transfer the call to. Note that this selection may be done using the Directory soft key > Local Directory if desired.
-
Press OK or the handset's Call button to dial out.
-
After the party answers the call and you have consulted with them, press the Transfer soft key to complete the transfer.
Note: If you are using a handset, the transfer can be completed by hanging up. You can cancel the transfer before the call is connected by pressing the Cancel soft key.
Call Transfer on Standard Handsets (T42S. or T42G)
Blind Transfer
-
Press the Transfer soft key during a call.
-
Enter the number you want to transfer the call to.
-
Press the Transfer soft key to complete the transfer.
Semi-Attended Transfer
-
Press the Transfer soft key during a call.
-
Enter the number you want to transfer the call to. Note that this selection may be done using the Directory soft key > Local Directory or History if desired.
-
Press OK to dial out.
-
When you hear the receiving line ringing, press the Transfer soft key to complete the transfer.
Attended Transfer
-
Press the Transfer soft key during a call.
-
Enter the number you want to transfer the call to. Note that this selection may be done using the Directory soft key > Local Directory or History if desired.
-
Press OK to dial out.
-
After the party answers the call and you have consulted with them, press the Transfer soft key to complete the transfer.
Note: If you are using a handset, the transfer can be completed by hanging up. You can cancel the transfer before the call is connected by pressing the Cancel soft key.
Call Transfer on Premium Handsets (T48S or T48G)
Blind Transfer
-
Press the handset's Transfer button or the Transfer soft key during a call.

-
Enter the number you want to transfer the call to.
-
Press the Transfer soft key to complete the transfer.
Semi-Attended Transfer
-
Press the handset's Transfer button or the Transfer soft key during a call.
-
Enter the number you want to transfer the call to. Note that this selection may be done using the Directory soft key > All Contacts or Remote Phone Book, or the History soft key if desired.
-
Press OK or select the desired contact/phone number to dial out.
-
When you hear the receiving line ringing, press the handset's Transfer button or the Transfer soft key to complete the transfer.
Note: If you are using a handset, the transfer can be completed by hanging up.
Attended Transfer
-
Press the handset's Transfer button or the Transfer soft key during a call.
-
Enter the number you want to transfer the call to. Note that this selection may be done using the Directory soft key > All Contacts or Remote Phone Book, or the History soft key if desired.
-
Press OK or select the desired contact/phone number to dial out.
-
After the party answers the call and you have consulted with them, press the handset's Transfer button or the Transfer soft key to complete the transfer.
Note: If you are using a handset, the transfer can be completed by hanging up. You can cancel the transfer before the call is connected by pressing the Cancel soft key.
Call forwarding is available for standard Australian landline or mobile numbers. You cannot forward calls to international, 13/1300/1800 or premium numbers.
Call Forward handset quick codes
| Action | Dial quick code |
|---|---|
| Activate Call Forward Busy (forward when phone is engaged) |
*90 <PHONE NUMBER> |
| Deactivate Call Forward Busy | *91 |
| Activate Call Forward No Answer (forward when call is not answered) |
*92 <PHONE NUMBER> |
| Deactivate Call Forward No Answer | *93 |
| Activate Call Forward Immediate (forward calls immediately) |
*72 <PHONE NUMBER> |
| Deactivate Call Forward Immediate | *73 |
| Activate Call Forward Not Reachable (forward when phone is offline, inactive or faulty) |
*94 <PHONE NUMBER> |
| Deactivate Call Forward Not Reachable | *95 |
Call Forward settings via Frontier Portal
-
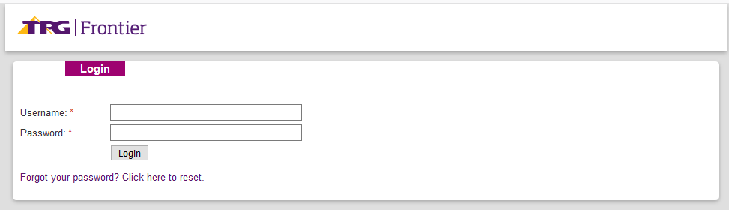
Log in to Frontier Portal. If you have never logged in before, please watch this video.
-
Select the desired BizPhone user to edit.
-
Select Basic.
-
Under "Call Forward", set the switches for the desired call forwarding options (No Answer, Busy, Immediate or Not Reachable) to ON if you wish to enable them, or OFF if you wish to disable them.
-
Enter the phone number to forward calls to for each enabled option.
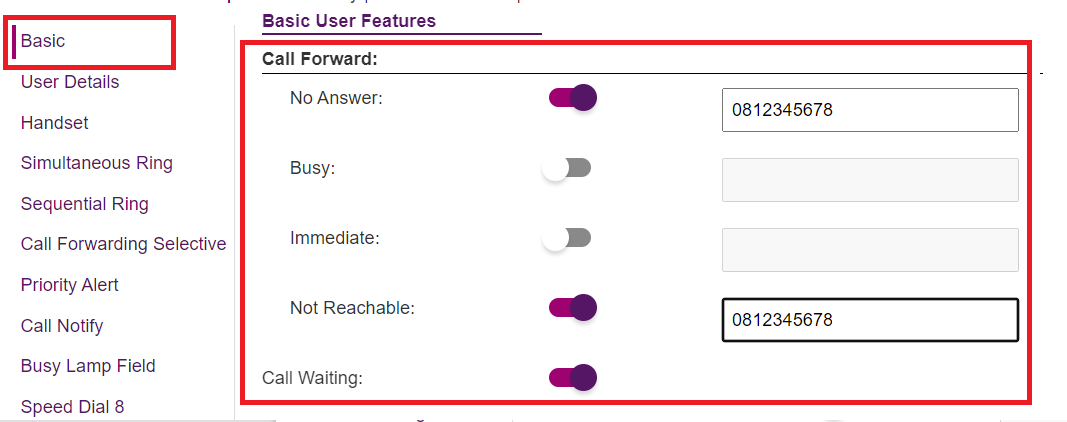
-
Hit Update at the bottom of the screen to save.
BizPhone handsets/users are pre-configured to accept and play back voice mail messages by default. This guide will cover how to listen to voice mail, change your greeting, and forward voice mails to email.
Select one of the links below to jump to a query:
- Listening to voice mail
- Setting a new voice mail greeting via handset
- Setting a new voice mail greeting via Frontier Portal
- Forwarding voice mail to email via Frontier Portal
Listening to voice mail
-
Press the envelope button/icon ✉ on your BizPhone handset or softphone. If you are a BizPhone ATA line user, dial *62 instead.
-
Enter your voice mail passcode. If you don't know your passcode, please see this guide.
-
Press 1 to enter your voice mail box.
-
Press 1 to listen to your messages.
Setting a new voice mail greeting via handset
-
Press the envelope button/icon ✉ on your BizPhone handset or softphone. If you are a BizPhone ATA line user, dial *62 instead.
-
Enter your voice mail passcode. If you don't know your passcode, please see this guide.
-
Press 1 to enter your voice mail box.
-
To set a Busy greeting (played when you are already on a call) press 2. To set a No answer greeting (played when the call is not answered) press 3.
-
Follow the voice prompts to record and save your greeting.
Setting a new voice mail greeting via Frontier Portal
Your audio file must meet the following specifications:
| Audio file format | Specifications |
|---|---|
| .WAV |
|
| .WMA |
|
| Both .WAV and .WMA |
|
If required, click here to search for online audio conversion sites to find one that best suits you.
-
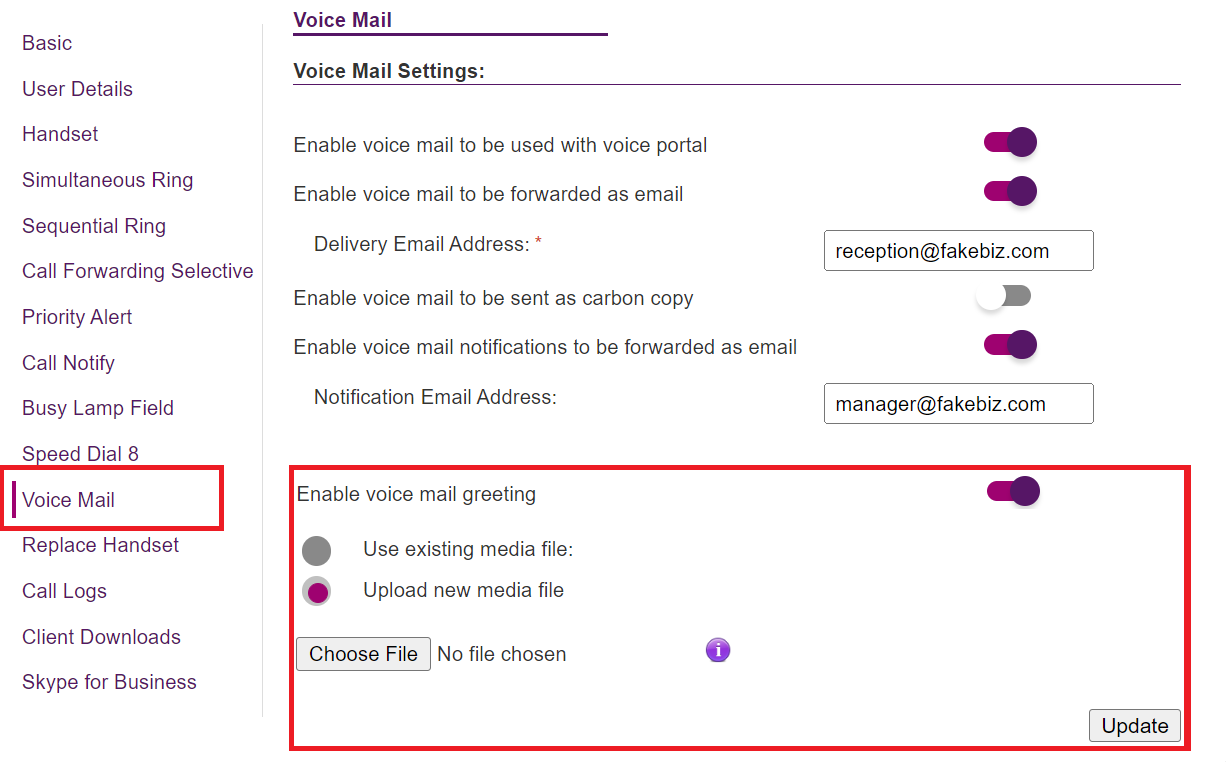
Log in to Frontier Portal. If you have never logged in before, please watch this video.
-
Select the desired BizPhone user to edit.
-
Select Voice mail.
-
Set the Enable voice mail greeting switch to ON.
-
Select Upload new media file and use the Browse button to select your audio file.
-
Hit Update to save.
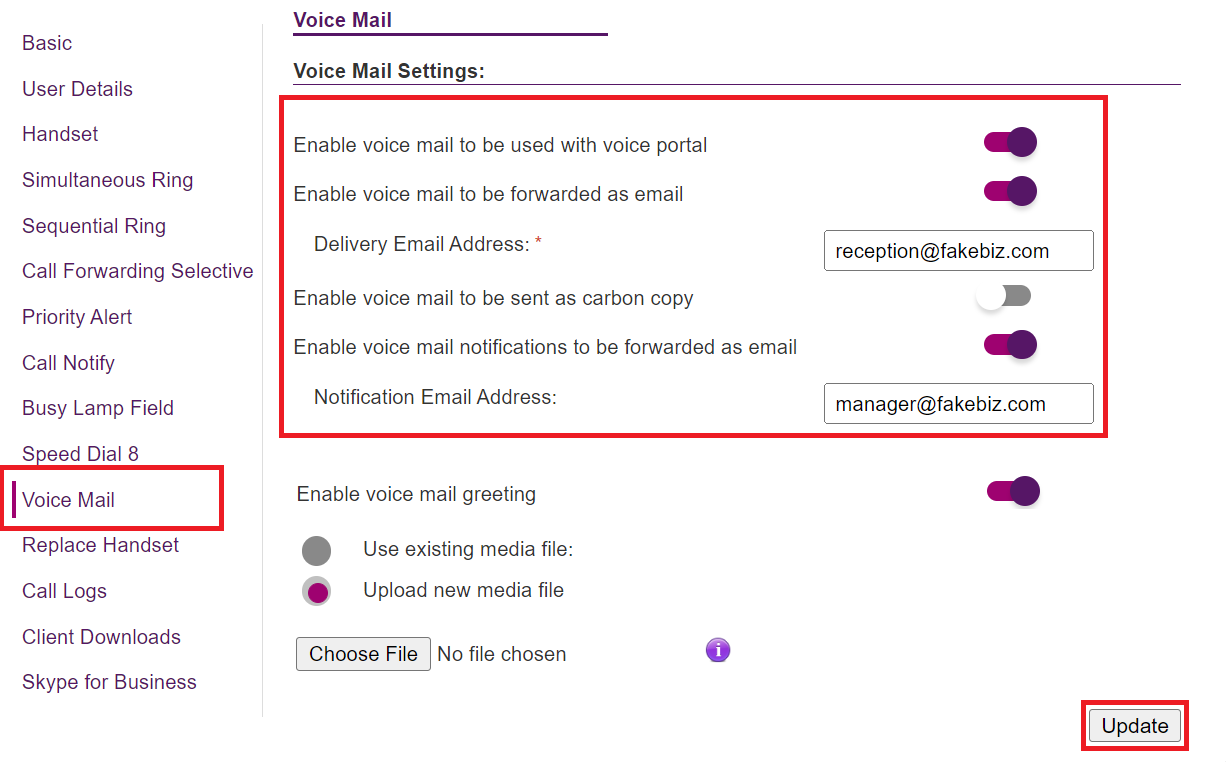
Forwarding voice mail to email via Frontier Portal
-
Log in to Frontier Portal. If you have never logged in before, please watch this video.
-
Select the desired BizPhone user to edit.
-
Select Voice mail.
-
Set the Enable voice mail to be forwarded as email switch to ON.
-
Enter the Delivery email address.
-
(Optional) If you wish to forward voice mail to additional email addresses, set the Enable voice mail to be sent as carbon copy switch to ON and enter an additional email address.
-
(Optional) If you wish to receive an additional email notification about forwarded voice mail, set the Enable voice mail notifications to be forwarded as email to ON and enter a notification email address.
-
Hit Update to save.
To get started, select your internet type:
- nbn FTTC
- nbn FTTB/N
- nbn FTTP
- nbn HFC
- nbn Wireless
- TPG Fibre to the Home (FTTH)
- TPG Fibre to the Building (FTTB)
Don't know which type of internet you have? Check the email from us about your TPG order.
If you can't get calls on your TPG Voice service, these steps will help you identify the issue.
TPG Voice is a VoIP phone service that works over the internet.
- Is your phone service still new? If it was only ordered recently, we'll send you and email and SMS when it's ready to use.
If you're moving an existing phone number to TPG: After your internet is connected, it can take another 5 days to transfer your number. During this time you'll be make calls using a temporary number, but you won't get calls. -
Is your internet working? Your phone service can't work without internet.
You can check your address for an internet outage or planned maintenance on our Network Status page. - Find your modem and make sure your phone and all cables are plugged in securely and not damaged.
You’ll need to replace any broken or chewed cables. If your phone is damaged, please replace it or contact the seller for a warranty claim.
-
Make sure your phone has power.
Wireless phones may have batteries that need to be recharged or replaced. -
Turn off your modem’s power outlet for at least 5 minutes.
-
Turn the outlet back on and wait for your modem’s Internet light to come on, then see if you can get a call.

-
Still can’t get calls? Use another phone to call us on 13 14 23 or contact us on our Live Chat and we'll help you.
If your Wi-Fi's running slow, these steps will help you identify the issue.
-
Stand next to your modem and run a speed test.
Wi-Fi usually has a range of 30 metres indoors, but this can be reduced by walls and other obstacles between your devices and your modem. -
If your Wi-Fi is only slow in certain parts of your home, check out our guide on improving Wi-Fi signal.
-
Make sure that the device you’re using to run speeds tests is the only one connected to your modem. Unplug all other devices from your modem’s Ethernet ports and turn off other devices that are connected to the Wi-Fi.
If you're using a phone, turn off 4G/5G data to make sure that your phone is using the Wi-Fi. -
On your one device, close all other apps using the internet, then run a speed test.
-
If your speed has improved on a single device, you may be running more devices or apps than your connection can handle at the same time. Some apps run in the background - you should close them if you don't need them.
If you need your internet to support more devices or apps at the same time, please call us on 13 14 23 to see if you can switch to a different type of internet service that will better suit your needs. -
Wi-Fi still slow? If you have a TPG modem, please call us on 13 14 23 and we'll help you out.
If you have a third-party modem, please check the manufacturer's website for support.
Here’s how you can set up a compatible bring-your-own (BYO) modem for TPG nbn HFC.
Your nbn Phone service and included calls are not available if you use a BYO modem.
Select one of the links below to jump to a query:
Modem compatibility
To work on TPG nbn HFC, your modem must:
- Be nbn-ready and able to support your nbn plan speed
- Support PPPoE connections by Ethernet WAN
For a list of modems tested by our team, see nbn BYO modem requirements.
General nbn® HFC setup guide for any modem
All modems are different. If this advice doesn’t work for your modem, check the manufacturer’s website for a guide on how to plug in and enter the TPG settings.
- Find your nbn Connection Box (NCB) – this should be connected to your cable wall socket, which may be near another cable wall socket for a cable TV service. Unplug any old modem from the nbn Connection Box and power outlet.
If your NCB is missing, please call us on 1300 023 575. - Use an Ethernet cable to connect your modem's WAN or LAN/WAN port to your NCB's UNI-D1 or 2.5G port.
NCBs with 2.5G ports were supplied from 1 October 2024. - Use the power cable to connect your modem's Power port to a power outlet, then turn it on.
If your modem has a power button or switch, turn it on.
- Connect a device to your modem. You can use an Ethernet cable to connect a device to one of the LAN or Ethernet ports, or connect via WiFi.
The default WiFi name (SSID) and password can be found on your modem’s barcode sticker.
- On your connected device, open your web browser and go to your modem’s gateway address (e.g. http://192.168.1.1). The gateway address and login details can be found on the barcode sticker.
Modems may have a login username and password, or just a password.
- Make sure your modem has the following settings. If you’re not sure how to do this, check the manufacturer’s website for a guide.
Mode/Modulation: WAN
Connection Type: PPPoE
- You’ll need to enter your TPG username and password for the PPPoE connection. Your username is in emails from us about your TPG order, and on your TPG invoice.
If you forgot your password, you can reset it. - Save your settings and wait 5-10 minutes for your modem to connect.
- You should now be online. If you can’t view a website or notice a red or unlit Internet light on your modem, call us on 1300 997 271 for help.
We’re fully trained on TPG modems, but please note that there may be limited support for your BYO modem.
Check the manufacturer's website for a setup guide on how to plug in and enter the TPG Broadband Settings.