Different types of nbn are available in different areas. Here's what you need to know about each one.
Select one of the links below to jump to a query:
- nbn® FTTP (Fibre to the Premises)
- nbn® FTTB/FTTN (Fibre to the Building/Fibre to the Node)
- nbn® FTTC (Fibre to the Curb)
- nbn® HFC (Hybrid Fibre Coaxial)
- nbn® Wireless
- Phone services on the nbn®
nbn® FTTP (Fibre to the Premises)
How nbn FTTP is connected

Fibre optic cable will run all the way to your premises, connected to an nbn Premises Connection Device installed on the outer wall of your home. This will be wired to an indoor nbn Connection Box (NCB).
Older nbn FTTP installations may also have a Power Supply Unit connected to the NCB. Learn more about the different NCBs.

Installation requirements for nbn FTTP
If your home hasn't been connected to the nbn before, an nbn installer will need to come install the equipment. Someone over the age of 18 must be home during the installation.
The best spot for your indoor nbn Connection Box equipment is:
- Within 3 metres of a power outlet.
- In an office or study, or near any existing phone sockets.
- A cool, dry, and ventilated area with no sinks or water outlets.
- Away from busy areas where it may be knocked or damaged.
- A place where it can be easily reached.
- A place where you’re not planning any major renovations.
nbn® FTTB/FTTN (Fibre to the Building/Fibre to the Node)
How nbn FTTB/FTTN is connected


nbn FTTB: Fibre optic cable will run to your building's Main Distribution Frame (MDF), which is typically in the basement or a locked telecommunications cabinet. From there, copper wiring will run to a wall socket in each unit within the building.
nbn FTTN: Fibre optic cable will run to an underground or above-ground Node in your street or a street nearby. From there, copper wiring will run to a wall socket in each property.
nbn wall sockets are typically the same ones you used previously for ADSL internet or landline phones.

Installation requirements for nbn FTTB/FTTN
In most cases, an nbn installer won’t need to come to your house – any installation work will be done in the street. We'll let you know if an installer needs to come install a new copper line or wall socket.
nbn® FTTC (Fibre to the Curb)
How nbn FTTC is connected

Fibre optic cable will run to a reverse-powered Distribution Point, typically underground or mounted on a pole in your street. From there, copper wiring will run to a wall socket in your home. An nbn Connection Device will be plugged into the wall socket.
In apartment complexes, this copper wiring may run to the building's Main Distribution Frame (MDF) before going to each unit.
nbn wall sockets are typically the same ones you used previously for ADSL internet or landline phones.

Installation requirements for nbn FTTC
If your home hasn't been connected to the nbn before, an nbn Connection Device will be delivered to you.
In most cases, an nbn installer won’t need to come to your house – any installation work will be done in the street. We'll let you know if an installer needs to come install a new copper line or wall socket.
nbn® HFC (Hybrid Fibre Coaxial)
How nbn HFC is connected

Fibre optic cable will run an underground or above-ground Node in your street or a street nearby. From there, HFC wiring will run to a wall socket in your home. An nbn Connection Device will be plugged into the wall socket. An nbn Connection Box will be connected to the wall socket.
nbn wall sockets are typically the same ones you used previously for cable internet or cable TV services. If an nbn wall socket needs to be shared with a cable TV service, it may be fitted with a splitter so two cables can plug into one wall socket.


Installation requirements for nbn HFC
If your home hasn't been connected to the nbn before, an nbn Connection Box will be delivered to you.
In most cases, an nbn installer won’t need to come to your house – any installation work will be done in the street. We'll let you know if an installer needs to come install a new HFC line or wall socket.
nbn® Wireless
How nbn Wireless is connected
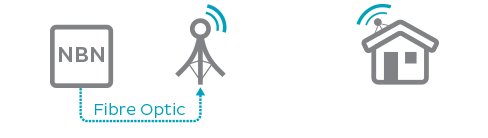
An outdoor antenna will be installed on your roof, gutter or a nearby free-standing pole mount so it can get a wireless signal from your local nbn Wireless tower. The outdoor antenna will be wired to an indoor nbn Connection Box.

Installation requirements for nbn Wireless
If your home hasn't been connected to the nbn before, an nbn installer will need to come install the equipment. Someone over the age of 18 must be home during the installation.
The nbn installer will recommend the best location for the outdoor antenna to ensure Line of Sight with your local nbn Wireless tower.
The best spot for your indoor nbn Connection Box equipment is:
- Within 3 metres of a power outlet.
- In an office or study, or near any existing phone sockets.
- A cool, dry, and ventilated area with no sinks or water outlets.
- Away from busy areas where it may be knocked or damaged.
- A place where it can be easily reached.
- A place where you’re not planning any major renovations.
Phone services on the nbn®
All nbn FTTB/FTTN, nbn FTTC, nbn FTTP, nbn HFC & nbn Wireless services include a TPG Voice service if you choose a TPG modem. TPG Voice is not available if you choose to BYO modem.
TPG Voice is a VoIP (Voice over Internet Protocol) phone service that uses your internet connection to make phone calls.
nbn FTTP services connected before 23 May 2024 may have nbn Fibre Phone instead.
Note: Home Phone landline services are no longer sold by TPG. If you have an existing landline number, we can check if it's possible to transfer this number to a TPG Voice service.
"High risk" international destinations are commonly used for phone fraud, so they're blocked by default.
If you want to call high risk destinations, please call us on 1300 993 019. After an ID check, we can turn off high risk call blocking. The change will apply within 2 business days.
Note: High risk call blocking cannot be removed on destinations marked with * in the list below.
Current high risk international destinations
To look up a specific destination, press CTRL + F on your keyboard or long-press your phone screen and hit Find to open the Find tool. Type the name of the destination in the Find tool's search bar.
| Destination | Dialling code |
|---|---|
| ALGERIA | +213 |
| ASCENSION ISLAND | +247 |
| AUSTRIA SHARED COST* | +43820 |
| AUSTRIAN SERVICE | +438 |
| BENIN | +229 |
| BOLIVIA | +591 |
| BOSNIA AND HERZEGOVINA | +387 |
| CAMEROON | +237 |
| CAPE VERDE* | +238 |
| CENTRAL AFRICAN REPUBLIC | +236 |
| CHAD | +235 |
| COMORO ISLAND | +269 |
| CUBA | +53 |
| DEMOCRATIC REPUBLIC OF THE CONGO | +243 |
| DIEGO GARCIA | +246 |
| DJIBOUTI | +253 |
| ECUADOR | +593 |
| EQUATORIAL GUINEA* | +240 |
| ESTONIA | +372 |
| GABON | +241 |
| GAMBIA | +220 |
| GUINEA | +224 |
| GUINEA BISSAU* | +245 |
| HAITI | +509 |
| HONDURAS | +504 |
| LATVIA | +371 |
| LIBERIA | +231 |
| LITHUANIA | +370 |
| MACEDONIA | +389 |
| MADAGASCAR | +261 |
| MALAWI | +265 |
| MALDIVES | +960 |
| MALI | +223 |
| MARTINIQUE* | +596 |
| MAURITANIA | +222 |
| MONACO | +377 |
| MOLDOVA | +373 |
| MOROCCO | +212 |
| NICARAGUA | +505 |
| PALESTINE | +970 |
| REPUBLIC OF THE CONGO | +242 |
| SAINT PIERRE & MIQUELON* | +508 |
| SAO TOME & PRINCIPE* | +239 |
| SATELLITE SYSTEM | +882 |
| SATELLITE 881 | +881 |
| SENEGAL | +221 |
| SERBIA | +381 |
| SEYCHELLES | +248 |
| SIERRA LEONE | +232 |
| SOMALIA | +252 |
| SURINAME* | +597 |
| TIMOR-LESTE* | +670 |
| TUNISIA | +216 |
| UGANDA | +256 |
| UK SHARED COST* |
+44844 +44845 |
| UK SPECIAL* |
+4474172 +4474184 +44745222 |
| USA HIGH COST* | +1712432 |
| WALLIS & FUTANA* | +681 |
| ZAMBIA | +260 |
| ZIMBABWE | +263 |
*Call blocking to these destinations cannot be removed.
A factory reset is a last resort to fix a problem with your modem settings, or if you can't remember the modem password. You'll lose all your custom settings including any custom Wi-Fi name and password, so be ready to set up your modem again afterwards.
Don't have a TPG modem? Check the manufacturer's website for a guide.
Choose your modem
| Picture | Modem |
|---|---|
 |
NetComm NL20 Modem |
 |
Wi-Fi Max 5G Modem |
 |
Nokia FastMile 3.2 5G Modem |
 |
VX420-G2H Modem |
 |
VX220-G2V Modem |
 |
VX420-G2V Modem |
 |
Sagemcom 5866 5G Modem |
 |
TP-Link VR1600v Modem |
 |
Modem not listed here? Check for a user manual on Older TPG modems |
Factory reset your NetComm NL20 Modem
Factory reset in modem settings (recommended)
- Open your web browser and go to: http://192.168.1.1.
Can't log in? Factory reset with the reset button instead. - Log in with the Username and Password found on the modem's barcode sticker or use your custom password.

- In the left pane, click Advanced.
- Under System, select Configurations for the Settings page to open.

- Select the Factory Reset radio button and click Restore Default Settings.
If you want to keep custom Wi-Fi and Login details, you can click Semi-Reset.
- A confirmation popup will appear, click Yes to restore the factory settings.
- Wait for the factory reset to complete. Your modem will reboot.
- Set up your modem again by following its setup guide.
- We recommend that you restart any computers or Wi-Fi devices before trying to get online.
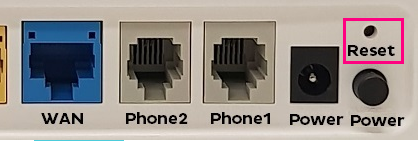
Factory reset with the Reset button
- This method is not recommended unless you are unable to view or log in to your device settings at 192.168.1.1.
- While your modem is turned on, find the RESET button on the back and use a pen or paperclip to hold it for 10 seconds, then release.

- After about 20 seconds, all the lights except for the power light will turn off.
- Wait for the factory reset to complete. Your modem will reboot.
- Set up your modem again by following its setup guide.
- We recommend that you restart any computers or Wi-Fi devices before trying to get online.
Factory reset your Wi-Fi Max 5G Modem
Factory reset in modem settings (recommended)
- Open your web browser and go to: http://192.168.1.1
- Log in with the Login Password found on the modem's barcode sticker or use your custom password.
Can't log in? Factory reset with the reset button instead.
- In the left pane, click Administration.
- Select Backup/Restore Setting.
- Under "Restore to Factory Defaults", click Restore to Factory Defaults.

- Wait for the factory reset to complete. After the factory reset, your modem will reboot.
- Set up your modem again by following its setup guide.
- We recommend that you restart any computers or Wi-Fi devices before attempting to get online.
Factory reset with the Reset button
- This method is not recommended unless you are unable to view or log in to your device settings at 192.168.1.1.
- While your modem is turned on, find the Reset button on the back and use a pen or paperclip to hold it for at least 10 seconds, then release.
The front LED will start flashing when the factory reset has started.
- Wait for your modem to finish rebooting; this may take several minutes.
- Set up your modem again by following its setup guide.
- We recommend that you restart any computers or Wi-Fi devices before attempting to get online.
Factory reset your Nokia FastMile 3.2 5G Modem
Factory reset in modem settings (recommended)
- Open your web browser and go to: http://192.168.1.1
- Select System, then General.
- Log in with the Username and Password found on the modem's barcode sticker or use your custom password.
Can't log in? Factory reset with the reset button instead.
- Hit Reset, then hit Yes.

- Wait for the factory reset to complete. Your modem will reboot.
- Set up your modem again by following its setup guide.
- We recommend restarting any computers or Wi-Fi devices before trying to get online.
Factory reset with the RESET button
- While your modem is turned on, find the RESET button on the base and use a pen or paperclip to hold it for 10-12 seconds, then release.

- Wait for the factory reset to complete. Your modem will reboot. The centre modem light will turn white before flashing red.
- Set up your modem again by following its setup guide.
- We recommend restarting any computers or Wi-Fi devices before trying to get online.
Factory reset your VX420-G2H Modem
Factory reset in modem settings (recommended)
- Open your web browser and go to: https://192.168.1.1.
- Log in with the default password "admin". If you have a custom password, use that instead.
Can't log in? Factory reset with the reset button instead. - Hit Advanced.
- Select System Tools, then Reboot Schedule.
- Hit Factory Restore, then Yes.

- Wait for the factory reset to complete. Your modem will reboot.
- Set up your modem again by following its setup guide.
- recommend restarting any computers or Wi-Fi devices before trying to get online.
Factory reset with the RESET button
- While your modem is turned on, find the RESET button on the back and use a pen or paperclip to hold it for 5 seconds, then release.

- Wait for the factory reset to complete. Your modem will reboot.
- Set up your modem again by following its setup guide.
- We recommend restarting any computers or Wi-Fi devices before trying to get online.
Factory reset your VX220-G2V Modem
Factory reset in the modem settings (recommended)
- Open your web browser and go to: https://192.168.1.1.
- Log in with the default password found on your modem's barcode sticker. If you have a custom password., use that instead.
Can't log in? Factory reset with the reset button instead.
- Hit Advanced.
- Select System Tools, then Reboot Schedule.
- Hit Factory Restore, then Yes.

- Wait for the factory reset to complete. Your modem will reboot.
- Set up your modem again by following its setup guide.
- >We recommend restarting any computers or Wi-Fi devices before trying to get online.
Factory reset with the RESET button
- While your modem is turned on, find the RESET button on the left side and use a pen or paperclip to hold it for 10 seconds, then release.

- Wait for the factory reset to complete. Your modem will reboot.
- Set up your modem again by following its setup guide.
- We recommend restarting any computers or Wi-Fi devices before trying to get online.
Factory reset your VX420-G2V Modem
Factory reset in modem settings (recommended)
- Open your web browser and go to: https://192.168.1.1
- Log in with the default password "admin". If you have a custom password, use that instead.
Can't log in? Factory reset with the reset button instead. - Hit Advanced.
- Select System Tools, then Reboot Schedule.
- Hit Factory Restore, then Yes.

- Wait for the factory reset to complete. Your modem will reboot.
- Set up your modem again by following its setup guide.
- We recommend restarting any computers or Wi-Fi devices before trying to get online.
Factory reset with the RESET button
- While your modem is turned on, find the RESET button on the back and use a pen or paperclip to hold it for 10 seconds, then release.

- Wait for the factory reset to complete. Your modem will reboot.
- Set up your modem again by following its setup guide.
- We recommend restarting any computers or Wi-Fi devices before trying to get online.
Factory reset your Sagemcom 5866 5G Modem
Factory reset in the modem settings (recommended)
- Open your web browser and go to: https://192.168.1.1.
- Log in with the default username “admin” and the default password listed as Web login on your modem's barcode sticker. If you have custom login details, use those instead.
Can't log in? Factory reset with the reset button instead.
- Hit My Sagemcom Box, then Maintenance.
- You have two options:
A) Select Semi-reset to reset everything except your custom Wi-Fi settings; OR
B) Select Reset for a full factory reset.
- Wait for the factory reset to complete. Your modem will reboot.
- Set up your modem again by following its setup guide.
- We recommend restarting any computers or Wi-Fi devices before trying to get online.
Factory reset with the RESET button
- While your modem is turned on, find the RESET button on the back and use a pen or paperclip to hold it for 5-8 seconds, then release.
Note: You may need to unplug any Ethernet cable in the 2.5GLAN port to reach the RESET button.
- Wait for the factory reset to complete. Your modem will reboot.
- Set up your modem again by following its setup guide.
- We recommend restarting any computers or Wi-Fi devices before trying to get online.
Factory reset your TP-Link VR1600v
Factory reset in the modem settings (recommended)
- Open your web browser and go to: https://192.168.1.1.
- Log in with the default username "admin" and default password "admin". If you have custom login details, use those instead.
Can't log in? Factory reset with the reset button instead. - Hit Advanced.
- Select System Tools, then Reboot.
- Hit Factory Restore, then Yes.

- Wait for the factory reset to complete. Your modem will reboot.
- Set up your modem again by following its setup guide.
- We recommend restarting any computers or Wi-Fi devices before trying to get online.
Factory reset with the RESET button
- While the modem is turned on, find the Reset button on the back and use a pen or paperclip to hold it for 6 to 8 seconds, then release.
- Wait for the factory reset to complete. Your modem will reboot.
- Set up your modem again by following its setup guide.
- We recommend restarting any computers or Wi-Fi devices before trying to get online.
If your BYO modem is still offline after you've plugged it in, you may need to update some settings. All other settings should be left as default.
Not sure how to update your modem's settings? We've got some nbn setup guides for popular modems here. If your modem isn't listed, please check the manufacturer's website for a guide.
Select one of the links below to jump to a query:
- nbn® FTTP
- nbn® FTTB/FTTN
- nbn® FTTC, HFC or Wireless
- TPG Fibre to the Home (FTTH)
- TPG Fibre to the Building (FTTB)
- Home Wireless Broadband & 5G Home Broadband
nbn® FTTP
| Internet Service Provider (ISP): | Other |
|---|---|
| Mode/Modulation: | WAN |
| Connection Type/Mode/WAN Type: | PPPoE |
| Username: | Enter your TPG username e.g. username@tpg.com.au |
| Password: | Enter your password (Forgot your password?) |
| DNS: | 203.12.160.35 or 203.12.160.36 |
nbn® FTTB/FTTN
Important: Your modem must support VDSL2.
| Internet Service Provider (ISP): | Other |
|---|---|
| DSL Standard/Mode/Modulation: | VDSL2 |
| Connection Type/Mode/WAN Type: | PPPoE |
| VDSL Profile: | 17a Multi Mode |
| VDSL Connection Type: | PTM |
| VLAN: | BYO Modem or unbundled service: OFF or Disabled Bundled nbn and Phone service: ON or Enabled (or you may need to set the VLAN networking standard, 802.1q) |
| VLAN ID: | BYO Modem or unbundled service: N/A Bundled nbn and Phone service: 2 |
| VLAN 802.1p/VLAN Priority: | BYO Modem or unbundled service: N/A Bundled nbn and Phone service: 0 (or set VLAN Priority to Disable) |
| Username: | Enter your TPG username e.g. username@tpg.com.au |
| Password: | Enter your password (Forgot your password?) |
| G.INP: | Enabled |
| G.Vector: | Enabled |
| DNS: | 203.12.160.35 or 203.12.160.36 |
| SOS (Save Our Showtime): | Supported* |
| ROC (Robust Overhead Channel): | Supported* |
*If your modem doesn't currently support SOS-ROC, please check the manufacturer's website to see if a firmware upgrade to support SOS-ROC is available. You'll find the make and manufacturer of your modem on its barcode sticker.
nbn® FTTC, HFC or Wireless
| Internet Service Provider (ISP): | Other |
|---|---|
| Mode/Modulation: | WAN |
| Connection Type/Mode/WAN Type: | PPPoE |
| VLAN: | BYO Modem or unbundled service: OFF or Disabled Bundled nbn and Phone service: ON or Enabled (or you may need to set the VLAN networking standard, 802.1q) |
| VLAN/802.1q Tagging: | BYO Modem or unbundled service: OFF or Disabled Bundled nbn and Phone service: ON or Enabled |
| VLAN ID: | BYO Modem or unbundled service: N/A Bundled nbn and Phone service: 2 |
| VLAN 802.1p/VLAN Priority: | BYO Modem or unbundled service: N/A Bundled nbn and Phone service: 0 (or set VLAN Priority to Disable) |
| Username: | Enter your TPG username e.g. username@tpg.com.au |
| Password: | Enter your password (Forgot your password?) |
| DNS: | 203.12.160.35 or 203.12.160.36 |
TPG Fibre to the Home (FTTH)
| Internet Service Provider (ISP): | Other (Do not select "TPG") |
|---|---|
| Mode/Modulation: | WAN |
| Connection Type/Mode/WAN Type: |
PPPoE |
| Username: | Enter your TPG username e.g. username@tpg.com.au |
| Password: | Enter your password (Forgot your password?) |
| DNS: | 203.12.160.35 or 203.12.160.36 |
TPG Fibre to the Building (FTTB)
There are two technology types:
- G.Fast FTTB
- VDSL FTTB
If you choose to BYO modem, the included phone service will not be available.
For G.Fast FTTB
Your modem must support Ethernet WAN. Your NTU (Network Termination Unit) will have G.Fast and LAN ports.
| Internet Service Provider (ISP): | Other (Do not select "TPG") |
|---|---|
| Mode/Modulation: | WAN |
| Connection Type/Mode/WAN Type: |
PPPoE |
| Username: | Enter your TPG username e.g. username@tpg.com.au |
| Password: | Enter your password (Forgot your password?) |
| DNS: | 203.12.160.35 or 203.12.160.36 |
For VDSL FTTB
Your modem must support VDSL2. Your NTU (Network Termination Unit), if you have one, will show either LINE + POWER and LINE ports, or MODEM and UPLINK ports.
| Internet Service Provider (ISP): | Other (Do not select "TPG") |
|---|---|
| DSL Standard/Mode/Modulation: | VDSL2 |
| Connection Type/Mode/WAN Type: | PPPoE |
| VDSL Profile: | 17a Multi Mode |
| VDSL Connection Type: | PTM |
| VLAN ID: | 2 |
| VLAN 802.1p/VLAN Priority: | 0 (or set VLAN Priority to Disable) |
| Username: | Enter your TPG username e.g. username@tpg.com.au |
| Password: | Enter your password (Forgot your password?) |
| G.INP: | Enabled |
| G.Vector: | Enabled |
| DNS: | 203.12.160.35 or 203.12.160.36 |
Home Wireless Broadband & 5G Home Broadband
You can't use a BYO modem with a Home Wireless Broadband or 5G Home Broadband service, and the SIM won't work in other modems. You'll need to use your TPG modem.
Your modem password is used to log in to the modem's default gateway to change your modem settings.
You'll need a strong custom password if you're going to use Remote Access on your modem. It's also useful to stop guests from being able to access your modem settings if you give them your WiFi password.
Important: If you forget a custom modem password, you'll need to factory reset your modem.
Don't have a TPG modem? Check the manufacturer's website for a guide.
Choose your modem:
| Picture | Modem |
|---|---|
|
|
NetComm NL20 Modem |
|
|
Wi-Fi Max 5G Modem |
|
|
Nokia FastMile 3.2 5G Modem |
|
|
VX420-G2H Modem |
|
|
VX220-G2V Modem |
|
|
VX420-G2V Modem |
|
|
Sagemcom 5866 5G Modem |
|
|
TP-Link VR1600v Modem |
|
|
Older TPG modems |
Change the password on a NetComm NL20 Modem
- Open your web browser and go to: http://192.168.1.1.
- Log in with the Username and Password found on the modem's barcode sticker or use your custom password.
- In the left pane, click Advanced.
- Under Management, select Passwords.

- Enter the Current Password, then add your desired password into the New Password and Confirm Password field.
- Hit Apply/Save to finish

Change the password on a Wi-Fi Max 5G Modem
You’ll use this password to log in to both the app and the modem dashboard.
From the My Internet Connect App
Don't want to use the app? You can change the Modem password in your web browser.
- Open the My Internet Connect App and tap the settings icon.
- Under Security, select Change Login Password, then Continue.
- Enter your current Login Password found on the modem's barcode sticker or use your custom password, then click Submit.
- Enter your desired new admin password and confirm it by typing it again.
- Hit Save to finish. From now on, you'll need to use your custom password to log in to your modem or the My Internet Connect App.
You can write down your password and keep it somewhere safe for future reference.
Using your web browser
- Open your web browser and go to: https://192.168.1.1
- Log in with the Login Password found on the modem's barcode sticker or use your custom password.
- From the left pane, click Administration.
- Under Password Settings enter your Current Password, then add your desired password into the New Password and Re-Enter Password for Verification fields. You can click the eye icon in the text boxes as you’re typing to show/hide the characters and make sure they match.
- Hit Save Settings to finish. From now on, you'll need to use your custom password to log in to your modem or the My Internet Connect App.
You can write down your password and keep it somewhere safe for future reference.
Change the password on a Nokia FastMile 3.2 5G Modem
- Open your web browser and go to: https://192.168.1.1
- Select System, then General. Log in with the default username “admin”, and the default password printed on your modem's barcode sticker. If you have custom login details, use those instead.
- Hit Change Password.

- Enter the Current Password.
- Type your new password in the New Password and Confirm Password boxes.

- Hit Update Password to finish. From now on, you'll need to use your custom password to log in to your modem or Nokia WiFi App.
You can write down your password and keep it somewhere safe for future reference.
Change the password on a VX420-G2H Modem
- Open your web browser and go to: https://192.168.1.1.
- Log in with the default password "admin". If you have a custom password, use that instead.
- Hit Advanced.
- Select System Tools, then Administration.
- Enter the Old Password.
- Type your new password in the New Password and Confirm New Password boxes.
- Save to finish.
- From now on, you'll need to use your custom password to log in to your modem.
You can write down your password and keep it somewhere safe for future reference.

Change the password on a VX220-G2V Modem
- Open your web browser and go to: https://192.168.1.1.
- Log in with the default password on your modem's barcode sticker. If you have a custom password, use that instead.
- Hit Advanced.
- Select System Tools, then Administration.
- Enter the Old Password.
- Type your new password in the New Password and Confirm New Password boxes.
- Click Save to finish.
- From now on, you'll need to use your custom password to log in to your modem.
You can write down your password and keep it somewhere safe for future reference.
Change the password on a VX420-G2V Modem
- Open your web browser and go to: http://192.168.1.1.
- Log in with the default password "admin", or use your custom password.
- Click Advanced.
- In the left-hand column, select System Tools, then Administration.
- Under "Account Mangement", enter the Old Password. You can then enter the desired password into the New Password and Confirm New Password boxes below (passwords must match). You can click the eye icon in the text boxes to hide/show the characters as needed.
- Click the Save button to finish.
- From now on, you'll need to use your custom password to log in to your modem.
You can write down your password and keep it somewhere safe for future reference.
Change the password on a Sagemcom 5866
- Open your web browser and go to: https://192.168.1.1.
- Log in with the default username “admin” and the default password on your modem's barcode sticker. If you have custom login details, use those instead.
- Select Access Control.

- Hit User.
- Enter the Old Password.
- Type your password in the New Password and Confirm New Password boxes.
- Hit Apply to finish
- From now on, you'll need to use your custom password to log in to your modem.
You can write down your password and keep it somewhere safe for future reference.
Change the password on a TP-Link VR1600v
- Open your web browser and go to: https://192.168.1.1.
- Log in with the default username "admin" and defalt password "admin". If you have custom login details, use those instead.
- Hit Advanced.
- Select System Tools, then Administration.

- Enter the Old User Name and Old Password.
- If you want to change the username, enter the New User Name.
- Type your new password in the New Password and Confirm New Password boxes.
- Click Save to finish.
- From now on, you'll need to use your custom password to log in to your modem.
You can write down your password and keep it somewhere safe for future reference.
Checking the status lights on your nbn Connection Box (NCB) for nbn Wireless can be useful for troubleshooting.
nbn Wireless Connection Box Status lights

| Light | States and meaning | |
|---|---|---|
| Power | Off = No power. Red = Your NCB is using backup battery power (if you have one) and power is low. Green = Your NCB has power. Flashing green = Your NCB is using backup battery power (if you have one). |
|
| Status | Off = No power or an unexpected state. Red = System fault detected. Please call us on 1300 997 271 as we'll need to lodge a ticket with nbn®. Flashing amber = Your NCB is booting up. Green = Your NCB is in test mode. Flashing green = Your NCB is operating normally. |
|
| Outdoor Unit (ODU) | Off = No power or an unexpected state. Red = Your NCB is is offline. Flashing red = Error detected. Please call us on 1300 997 271 as we'll need to lodge a ticket with nbn®. Green = Your NCB is online. This light flashes during data transfer. |
|
| Signal strength | Off = Your NCB is offline. Red = Weak signal. Amber = Medium signal. Green = Strong signal. |
|
If you already know the password for your TPG account, you can change it at any time in My Account.
Forgotten your password? Please see How to reset a forgotten password instead.
-
Log in to My Account and hit About Me.
Never used My Account before? Check out An Introduction to My Account. -
Under "Change password", hit Update password.

-
Fill out the form with your Current Password and New Password, then enter your new password again in Confirm Password.
Passwords must be 8-15 characters long, have both a lower case and uppercase letter and contain at least one number (0-9).
You can also use any of the following characters: ` ~ ! @ # $ % ^ & * ( ) _ + - = { [ } ] \ | ; , . / : < > ?
Passwords can't be based on your username or contain any spaces. -
Hit Change password to finish, and you're good to go.

Your TPG services may be suspended if you have an overdue invoice, or in response to a security incident. Here's how to get unsuspended if that happens.
For more info about suspensions, see Consequences of Restriction, Suspension or Disconnection.
Select one of the links below to jump to a query:
- How to unsuspend your TPG services (Overdue invoices)
- How to unsuspend your TPG services (Security incident)
How to unsuspend your TPG services (Overdue invoices)
-
If your TPG invoice isn't paid, we'll send you an email/SMS telling you the earliest date your services will be suspended. If you pay the invoice before that date, your services won't be suspended.
-
If your invoice isn't paid and your TPG services are suspended, you can Make a payment in My Account or call us on 13 14 23.
Having difficulties making a payment? Please see our Financial Hardship Policy. -
Once your payment has cleared, your TPG services should automatically unsuspend within one business day.
How to unsuspend your TPG services (Security incident)
-
When a security incident happens, we suspend services ASAP to prevent further abuse or unauthorised access. You'll be notified after your services are suspended, and we'll try to call you using the contact number(s) on your TPG account.
-
We'll explain anything you need to do to help secure your account, such as changing account or Wi-Fi passwords, or running antivirus and malware scans.
-
Once we've spoken to you to verify your identity and made sure that your TPG account is secure, your TPG services may be unsuspended.
For more advice about how to stay safe online, see Scams and Hoaxes.
This article provides information about the consequences if we, TPG Internet, exercise our right to restrict, suspend or disconnect one or more of your services for credit or debt management reasons.
We will make several attempts to contact you via email and/or SMS regarding any credit or debt management issues for your services. A notice will be sent to you in advance of any restriction, suspension or disconnection occurring.
If you are experiencing difficulties making this payment, then please see our Financial Hardship Policy for information about your options and how to speak to someone about your circumstances.
Select one of the links below to jump to a query:
- What are the consequences if my service is restricted?
- What are the consequences if my service is suspended?
- What are the consequences if my service is disconnected?
- How to make payment
What are the consequences if my service is restricted?
Service restrictions are typically related to spend management tools and may occur when you have used 100% or more of your service inclusions, such as data. Restrictions do not necessarily indicate that your services are at risk of suspension or disconnection.
If one or more of your services are restricted, you will not be able to use select features of the services.
For example, if you have a Mobile service and have used all of the monthly mobile data included in your plan, the ability to use mobile data will be restricted and you won't be able to access the internet. Other features of the service, such as receiving calls/SMS and making calls/SMS that are part of your plan’s included value, will remain available.
You will need to wait until your next billing period begins for the restriction to be removed. Alternatively, you may choose to top up your Prepaid Balance in My Account to purchase a mobile data block.
What are the consequences if my service is suspended?
If one or more of your services are suspended, you will not be able to use those services.
For example, if your suspended service is a fixed or mobile voice service, you won’t be able to make calls (except to emergency 000 services) on your phone or handset or use mobile data. If your suspended service is an internet service, you won’t be able to connect to the internet or use services that require connection to the internet, like VoIP.
You may not purchase additional services while one or more of your services are suspended. While the service is suspended, your ongoing minimum monthly plan charges will still apply (excluding Mobile and 4G/5G Home Broadband services).
How can I get my services unsuspended?
- Mobile and 4G/5G Home Broadband services: You will need to pay the amount to renew your prepaid service before the suspension is removed.
- Other services: You will need to pay all overdue amounts owing before the suspension is removed.
Restoration of your service can take up to 1 business day after payment has been received.
Failure to pay after services are suspended may lead to your services being disconnected.
What are the consequences if my service is disconnected?
Unlike suspension, disconnection of your service is permanent.
- Disconnection means you won’t be able to use any features of your services, including internet access.
- Phone services won’t be able to make or receive calls, including emergency 000 calls (except mobiles which can call 000 if your phone has power and you’re within the coverage of any Australian mobile network).
- You will need to reapply for new services, which may incur costs. Please note that following disconnection, the plan for your particular service may no longer be available, and your username or phone number may change.
- Any bundled discount entitlements will also be forfeited if the disconnection causes your account to become ineligible for the bundled discount.
- We may also require you to immediately stop using and return to us, or allow us to remove, any equipment or material belonging to us.
- We may delete all of your data from any storage media (you are solely responsible for backing up your data, such as voicemail messages).
- Mobile and 4G/5G Home Broadband services: You will still have to pay any applicable cancellation fees.
- Other services: We will send you a final invoice requesting payment of all outstanding charges incurred before disconnection, including any applicable cancellation fees. Failure to pay may affect your ability to reapply for a new service with us.
How to make payment
You can pay your outstanding amount by selecting "Make a payment" in My Account.
If you wish to discuss your account, please contact our Customer Service team via email or call 1300 993 011 (Monday - Friday 8am - 8pm, Weekends & Public Holidays 9am - 6pm).