A traceroute checks how data packets are sent to a specific address using your internet connection, taking note of each stop along the way. It's a good way to see the latency (delay) between different servers that make up the internet.
If you use PingPlotter, it will run a ping test and a traceroute at the same time.
Select one of the links below to jump to a query:
- PingPlotter on Windows
- PingPlotter on macOS
- PingPlotter on iOS (iPhone/iPad)
- Traceroute in Windows
- Traceroute in macOS
PingPlotter on Windows
-
Download PingPlotter at: http://pingplotter.com/download
You don't need to buy a subscription, you can use the Free version. -
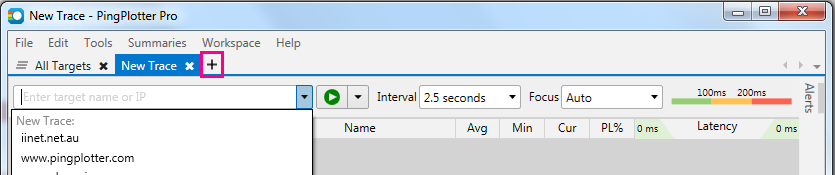
Open PingPlotter and hit the + (plus) icon to open a New Trace tab.
-
Type tpg.com.au or another address you want to to ping or traceroute, then hit Start.

-
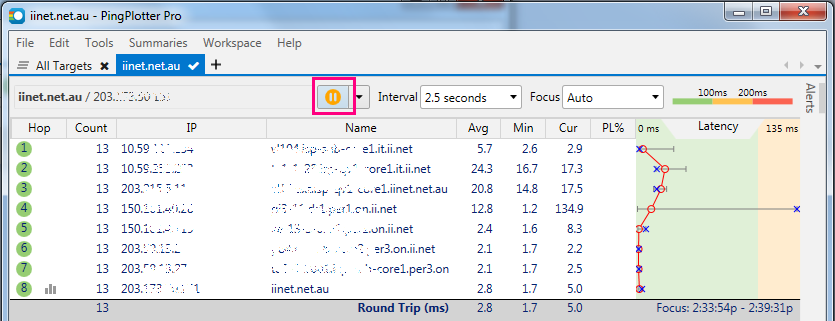
Let the test run for at least 60 seconds, then hit Pause.
-
Hit the Print Screen (PrntScr) key on your keyboard to screenshot your test results. You can use CTRL+V to paste your screenshot into any text editor, image editor or email app.
PingPlotter on macOS
-
Download PingPlotter at: http://pingplotter.com/download
You don't need to buy a subscription, you can use the Free version. -
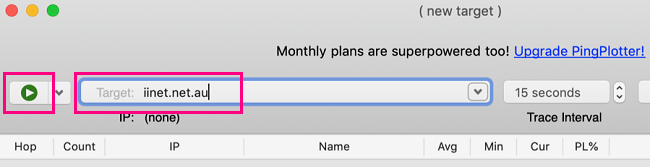
Open PingPlotter and type tpg.com.au or another address you want to ping or traceroute, then hit the Start.
-
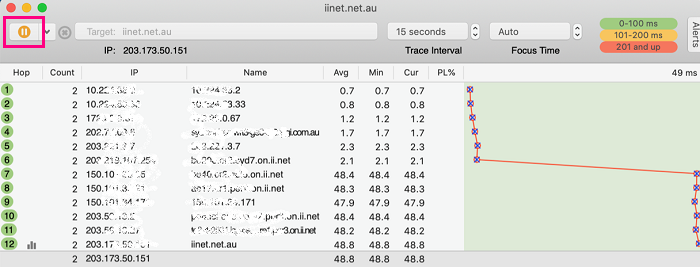
Let the test run for at least 60 seconds, then hit Pause.
-
Use the Command ⌘+Shift+3 keys on your keyboard to screenshot your test results. You can use Command ⌘+V to paste your screenshot into any text editor, image editor or email app.
PingPlotter on iOS (iPhone/iPad)
-
Open the App Store and search for 'PingPlotter" to install PingPlotter.
You don't need to buy a subscription, you can use the Free version.
-
Open PingPlotter and type tpg.com.au or another address you want to ping or traceroute, then hit Start.

-
Let the test run for at least 60 seconds, then hit Pause.
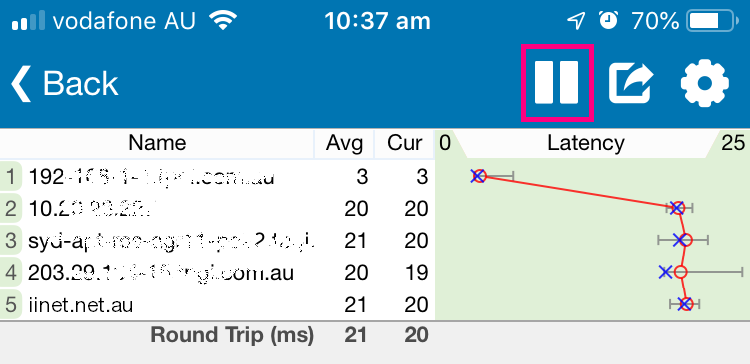
-
Hit the Share icon and select Screenshot.
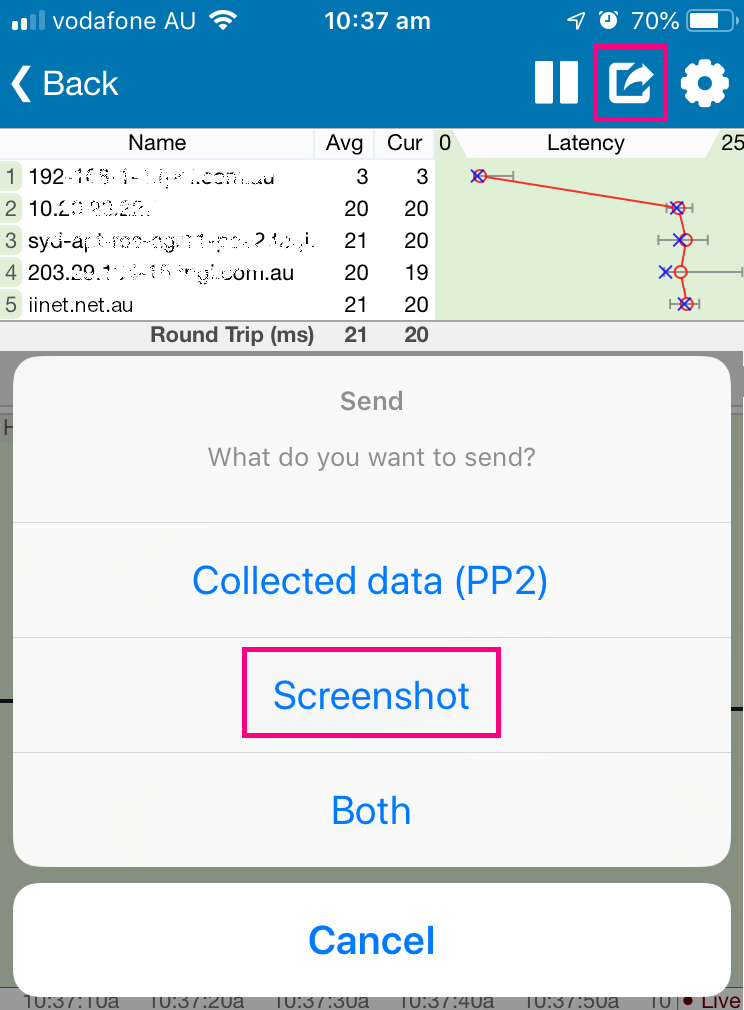
-
You can choose to save your screenshot to Pictures, or share it by Mail.
Traceroute in Windows
-
Hit Search and type "cmd" into the search bar.

-
Open the Command Prompt app.

-
Type “tracert” and then hit Space on your keyboard.
-
Type the address you want to traceroute, then hit Enter on your keyboard.
e.g. "tracert tpg.com.au"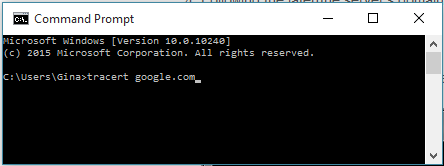
-
Wait for the test to finish.
-
A traceroute will test a maximum of 30 "hops". Each hop is a new server that the data passes through on its way to its destination. The first hop is your modem, and the last hop is the server for the address you've tracerouted.
Don't worry if some hops come up as "* * * Request timed out". Some servers deliberately ignore the data packets used for traceroute tests. -
Three latency times (in milliseconds) will be shown before the domain or IP address for each hop. The mean average of these times is considered to be the latency for that server.
For example, 32ms + 50ms + 33ms / 3 = a latency of 38.3 milliseconds.
You can search online for a specific IP address to get a better idea of where it is.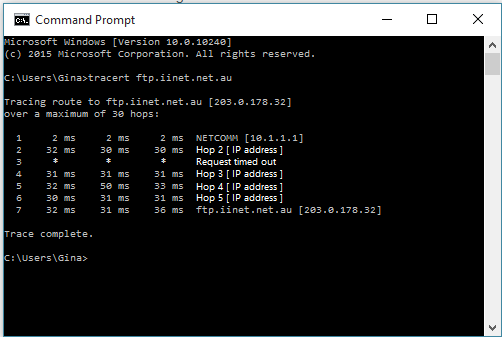
-
To copy-paste your traceroute results: Right-click in the Command Prompt window and select Mark to turn on the cursor. You can use the up/down arrow keys on your keyboard to move the cursor to the start of the text you want to copy.
Hold the Shift key and use the down/right arrow keys to highlight the text you want to copy, then hit the Enter key to copy the text.
Open Word, Notepad or any other text editor or email app and use CTRL+V to paste the copied text.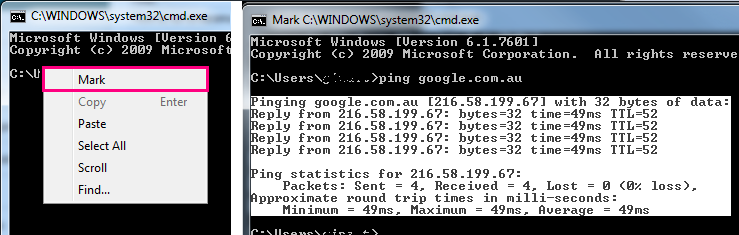
Traceroute in macOS
-
Open Finder and select Applications > Utilities, then open the Terminal app.
-
Type “traceroute” and then hit Space on your keyboard.
-
Type the address you want to traceroute, then hit Enter on your keyboard.
e.g. "tracert tpg.com.au"

-
Wait for the test to finish.
-
A traceroute will test a maximum of 30 "hops". Each hop is a new server that the data passes through on its way to its destination. The first hop is your modem, and the last hop is the server for the address you've tracerouted.
Don't worry if some hops come up as "* * * Request timed out". Some servers deliberately ignore the data packets used for traceroute tests. -
Three latency times (in milliseconds) will be shown before the domain or IP address for each hop. The mean average of these times is considered to be the latency for that server.
For example, 32ms + 50ms + 33ms / 3 = a latency of 38.3 milliseconds.
You can search online for a specific IP address to get a better idea of where it is. -
To copy-paste your traceroute results: Click and drag the cursor to select the text you want to copy, then right-click and select Copy, or hit Command ⌘+C on your keyboard.
Open TextEdit or any other text editor or email app and use Command ⌘+V to paste the copied text.
You may need to lodge a Statutory Declaration form in these situations:
- Someone else’s services are already connected at a property you own or rent.
- You need to take ownership of an account because the owner can no longer be contacted for any reason.
- Any other situation that requires a legal statement from you.
If you don't know what to do with your Statutory Declaration, please contact us.
How to lodge a Statutory Declaration
-
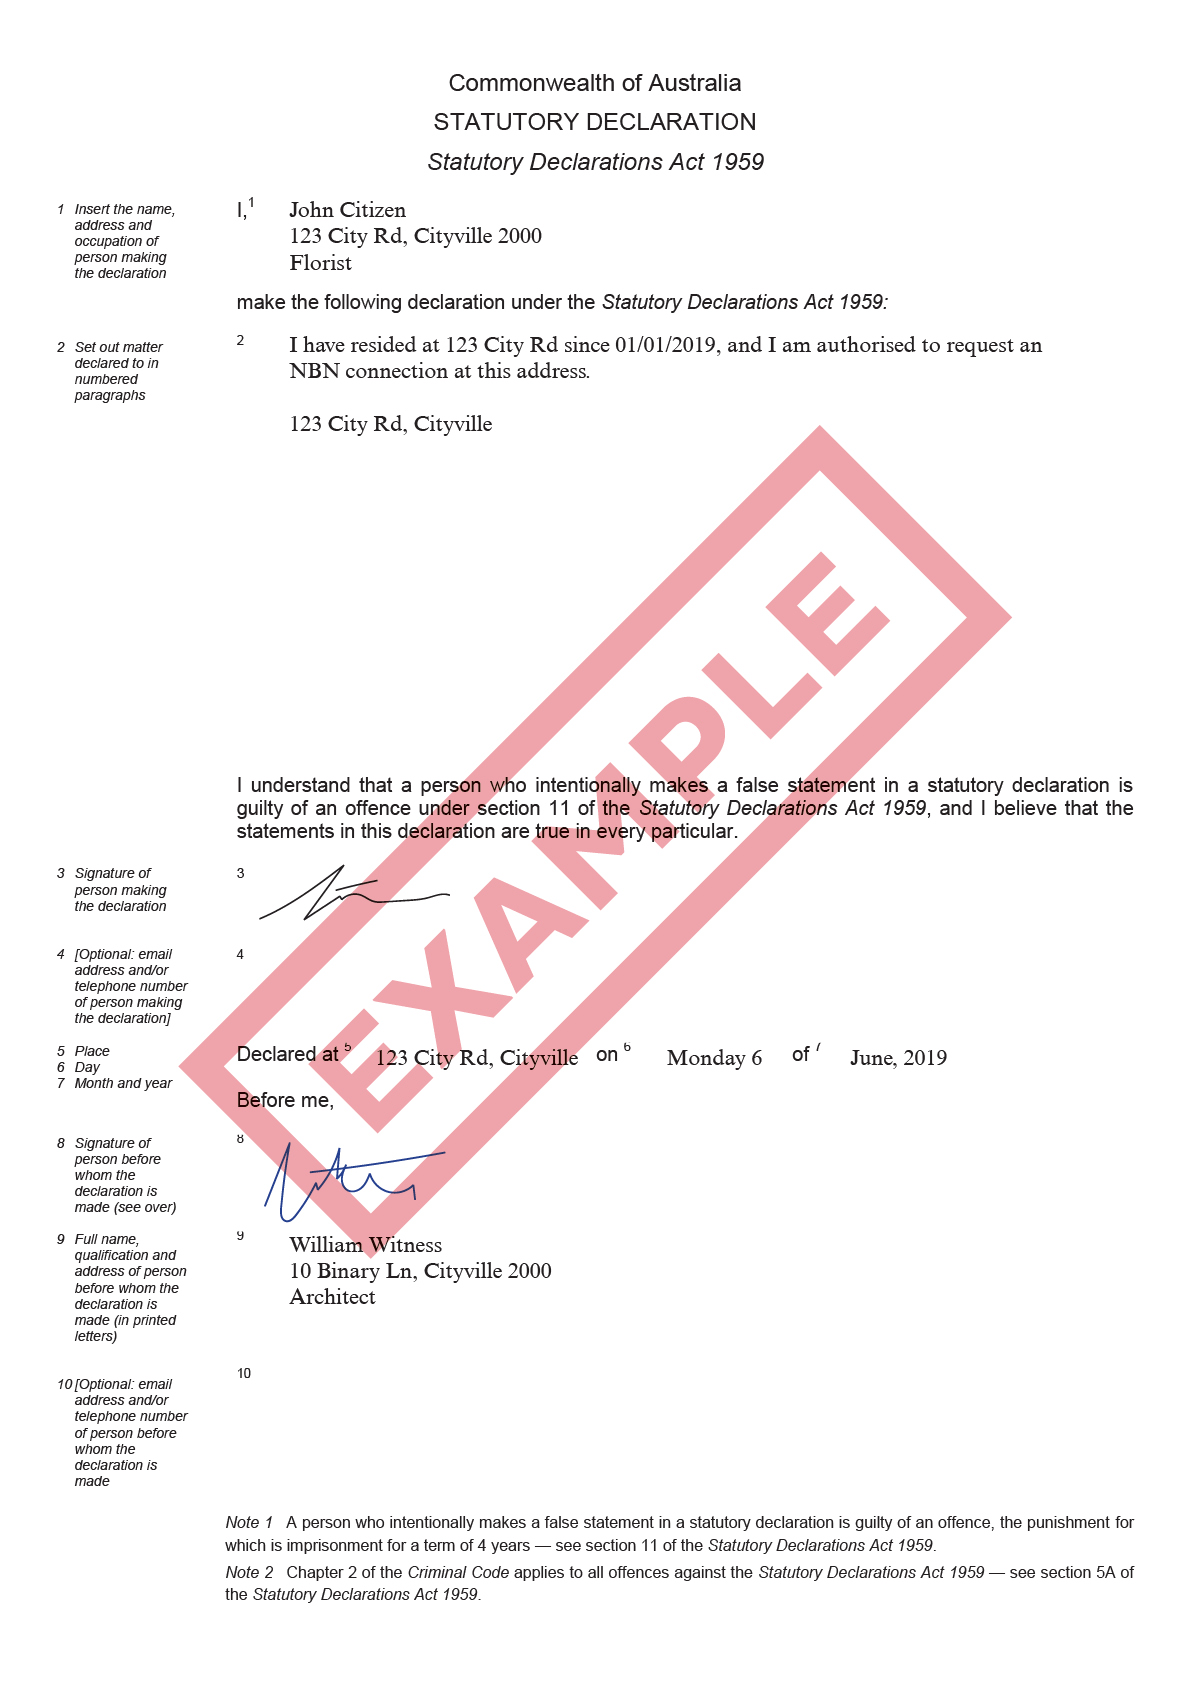
Download and/or print a copy of the form here. Single or double-sided printing is fine. If you don't have access to a printer, you can get a Statutory Declaration form from your local Post Office. Alternatively, your local library may be able to help you print the form.
-
Using a black or blue pen, fill out your Name, Address and Occupation, and then write your declaration in the space provided. If you're making a declaration as an authorised representative for a business, please state this clearly.
Example 1: Making a declaration as an individual
Example 2: Making a declaration as an authorised representative of a business -
Get your Statutory Declaration signed by a witness. A list of acceptable witnesses can be found on the Statutory Declaration form.
-
Sign and date your form in front of your witness and then have them sign their name and title.
-
Scan or take a photo of your Statutory Declaration form and email it to customer_service@tpg.com.au. Please include your Customer ID or TPG username in your email subject.
-
We'll contact you about the next steps once we get your Statutory Declaration.
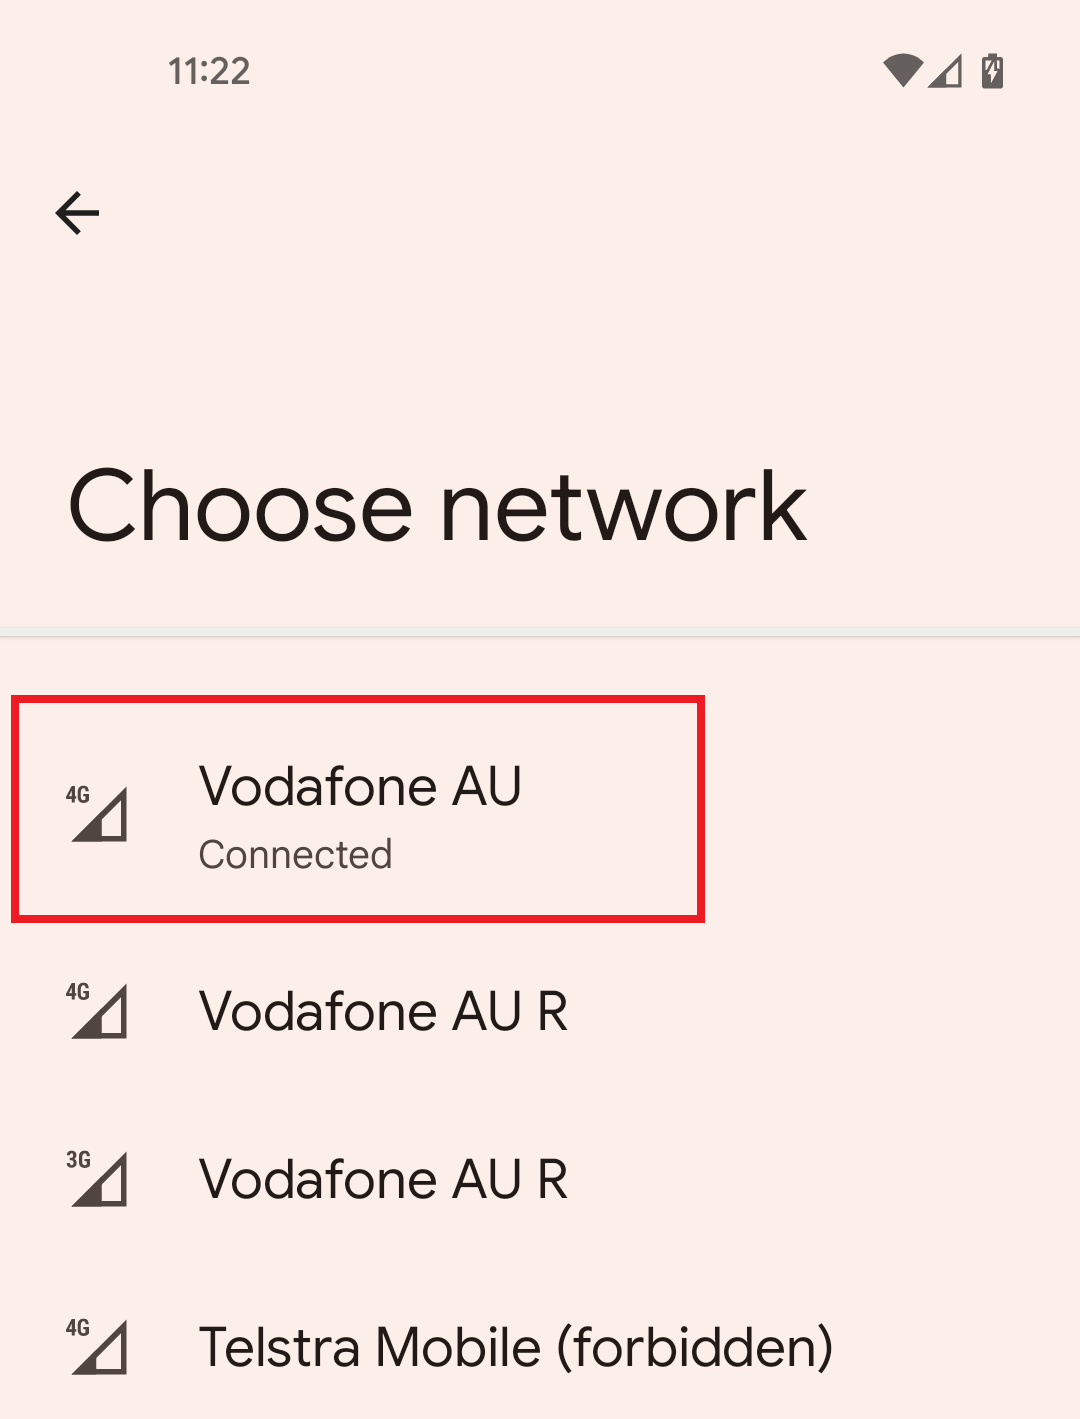
If your phone isn't automatically detecting TPG or Vodafone as the network carrier, you can select the network carrier manually.
Don't see a guide for your phone? Please check the manufacturer's website for a guide.
Select one of the links below to jump to a query:
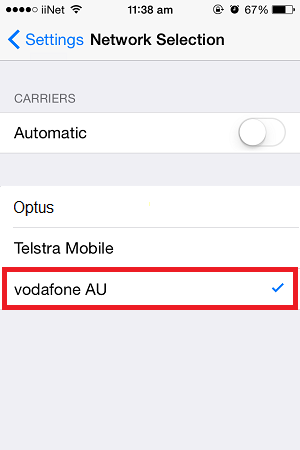
How to set the network carrier on an iPhone
-
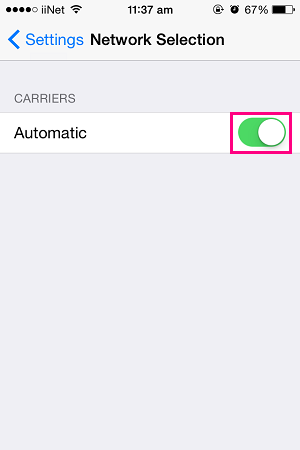
Open the Settings app.
-
Select Carrier.
-
Turn off the Automatic switch, then wait while your iPhone searches for available networks in the area.
-
Tap Vodafone AU, then exit the Settings app to finish.
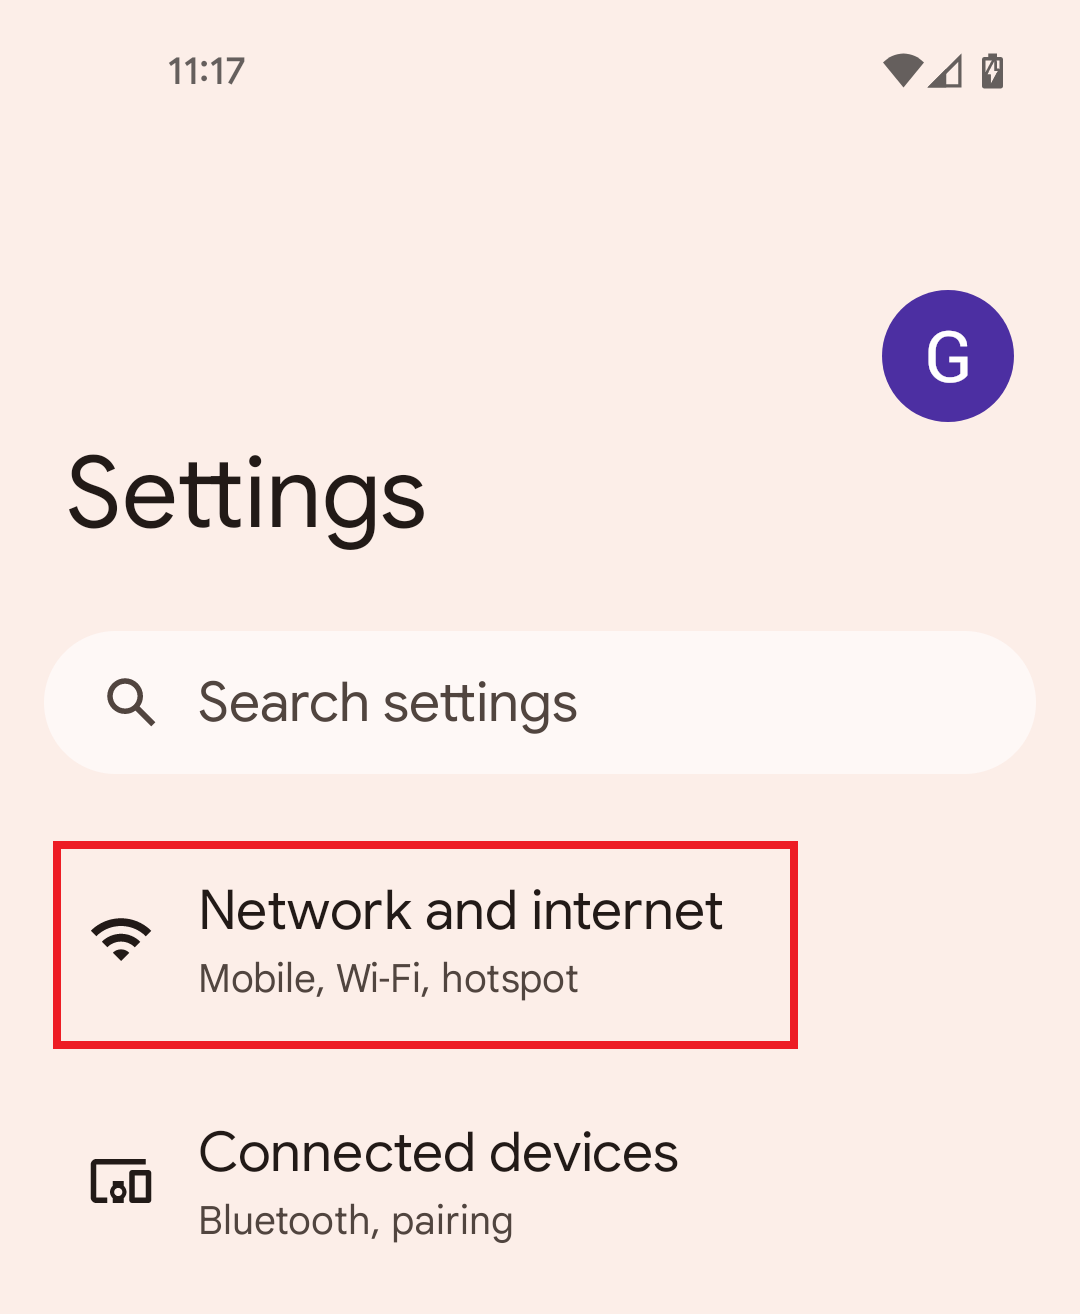
How to set the network carrier on Android OS
Android OS looks different depending on your phone and software version. If these steps don't work for you, please check the manufacturer's website for a guide.
-
Open the Settings app.
-
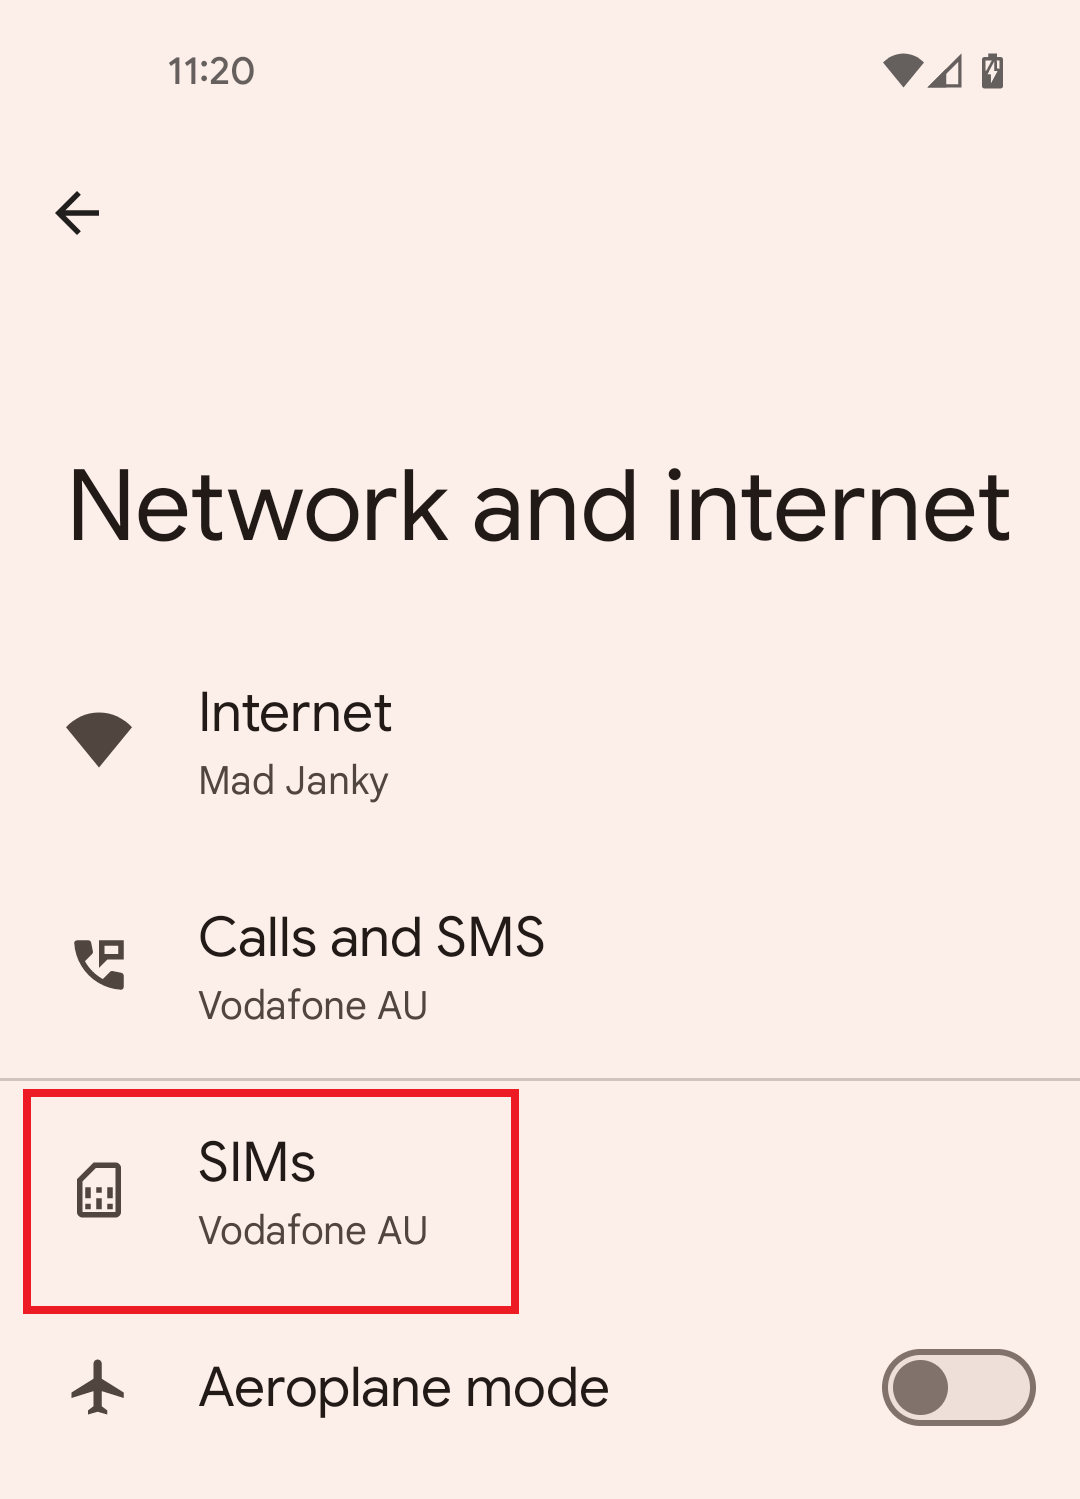
Tap Network and Internet.
-
Tap SIMs, then select your TPG SIM.
-
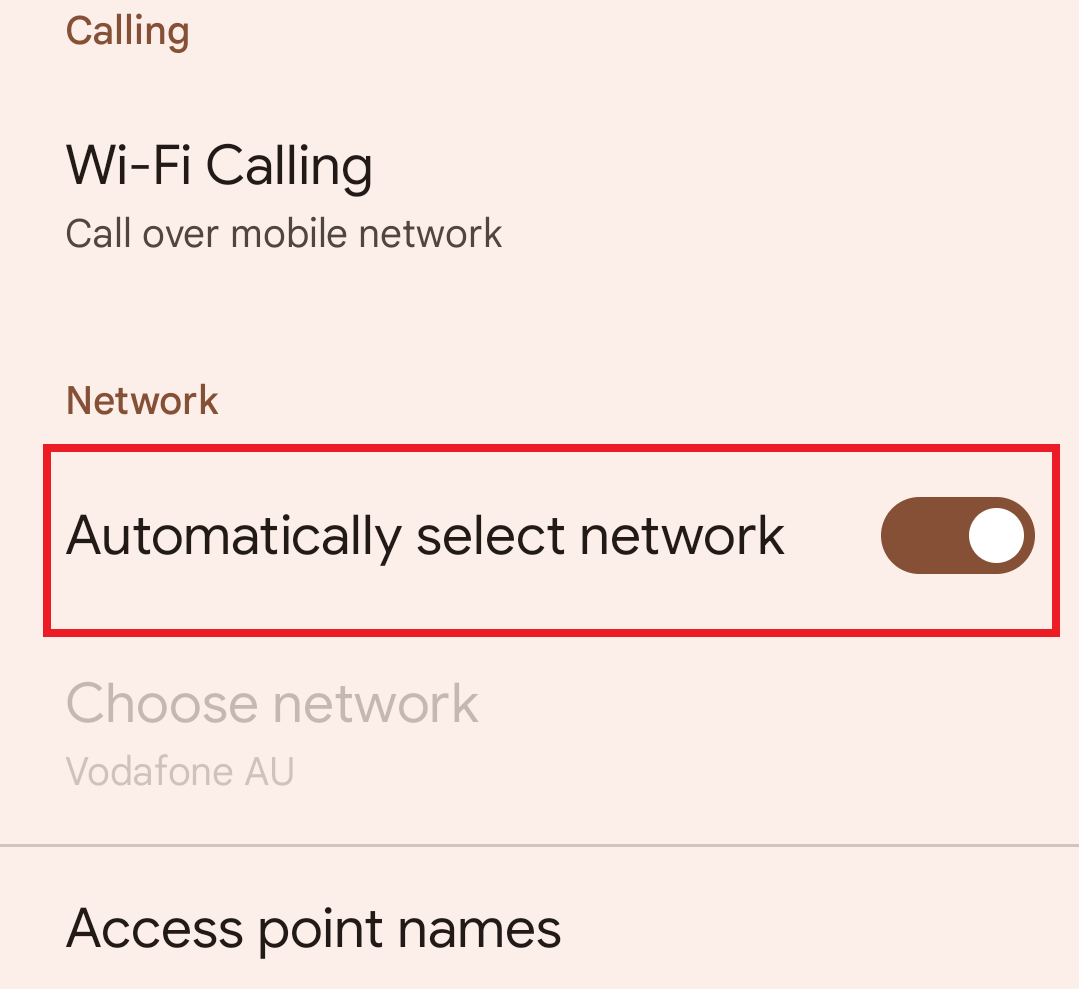
Scroll down and turn off the Automatically select network switch, then wait while your phone searches for available networks in the area.
-
Tap Vodafone AU, then exit the Settings app to finish.
If there's no communication betwen your modem and your device, then you won't be able to view websites or browse to your modem's default gateway. These steps will help identify the issue.
-
Make sure your computer is connected to your modem by Ethernet cable or Wi-Fi.
Note: Wi-Fi connections can't be over Guest Wi-Fi or Wi-Fi Protected Setup (WPS). -
Turn off your modem and your device and leave them off for at least 60 seconds.
-
Turn them back on and wait for them to reboot. When you modem's Internet light is back on, try to browse to your modem’s default gateway.

-
Do you have any devices connected to your modem with an Ethernet cable? If these devices can visit your modem's default gateway but devices on Wi-Fi can’t, switch to troubleshooting Wi-Fi No Connection.
-
Do you have multiple devices to test? If some devices can get to your modem's default gateway but others can't, the devices that can't may be faulty.
Faulty devices with a faulty wireless adapter may need to be repaired or replaced. If the device is a computer running Windows, a winsock reset may help. -
Still can't get to your modem's default gateway? Call us on 13 14 23 and we'll help you.
In most cases, your computer will get your DNS settings automatically. DNS may need to be set manually if you're having some browsing issues.
Select one of the links below to jump to a query:
Set DNS server in Windows
-
Log in to Windows with an Administrator account.
If your account doesn’t have Administrator privileges, you can't change your DNS server settings. -
Hit Search icon and search for "Control Panel".
-
Open the Control Panel app and select Network and Sharing Centre.
You may need to hit Network and Internet before you see Network and Sharing Centre.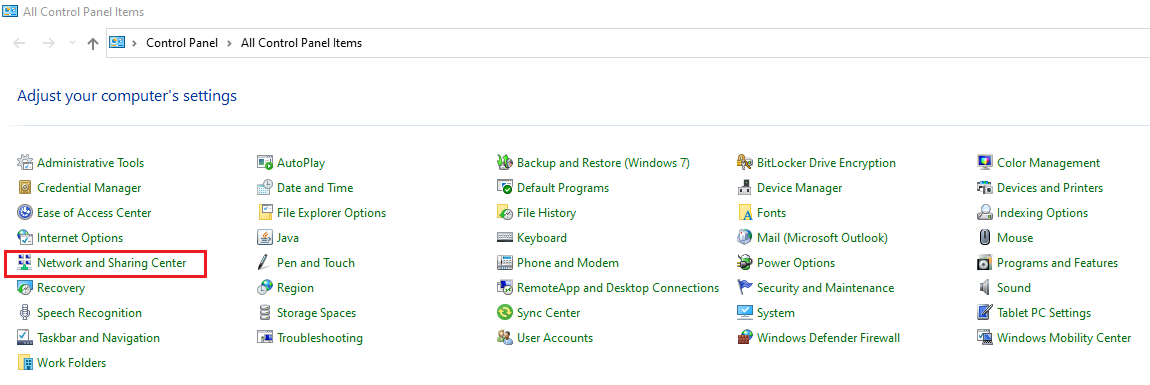
-
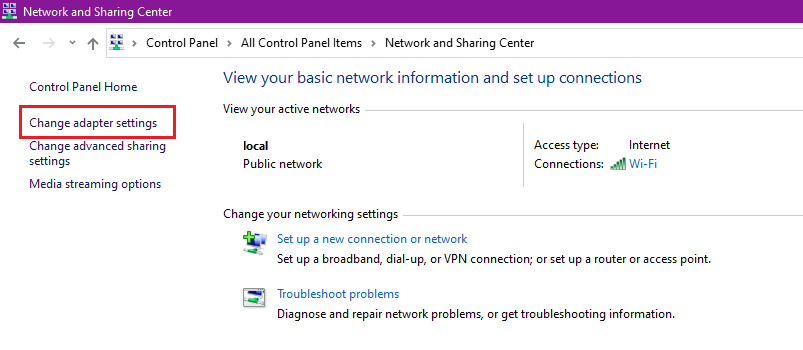
Hit Change adapter settings.
-
Right-click on your active internet connection and select Properties.
Your active internet connection may be Ethernet, Wireless Network Connection or Local Area Connection depending on how your computer is set up.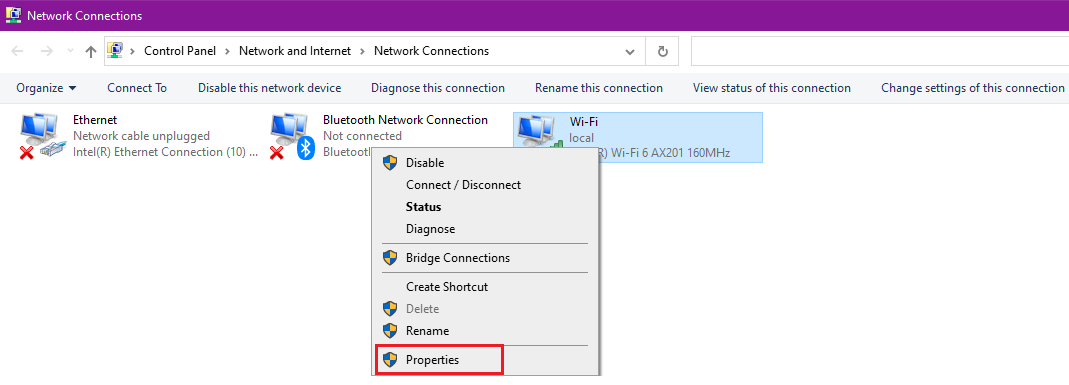
-
In the Networking tab, select Internet Protocol (TCP/IP), then hit Properties.
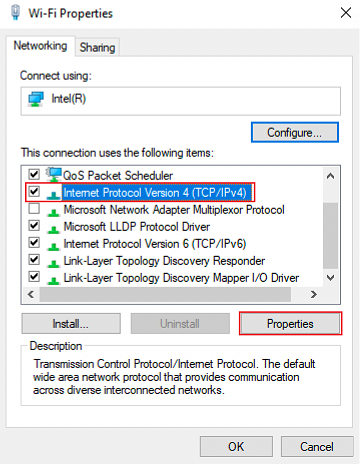
-
Select Use the following DNS server addresses and enter these settings:
Preferred DNS server: 203.12.160.35
Alternate DNS server: 203.12.160.36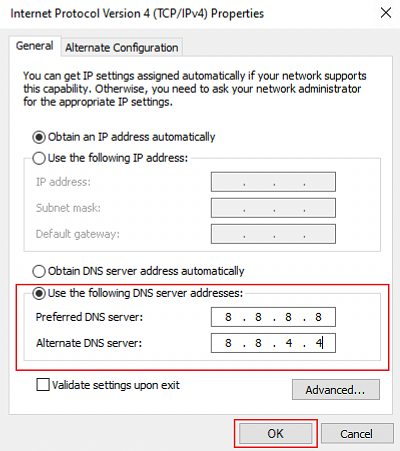
-
Hit OK to finish.
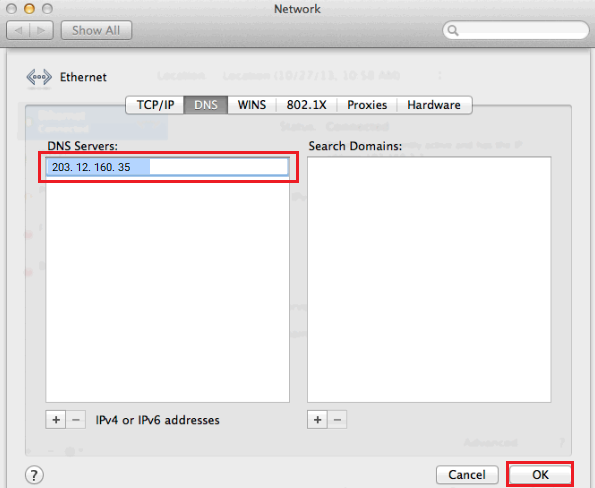
Set DNS server in macOS
-
Hit the Apple icon in the top right-hand corner and select System Preferences.
-
Select Network.
-
Select your connected network (Ethernet or Wi-Fi) and then hit Advanced.
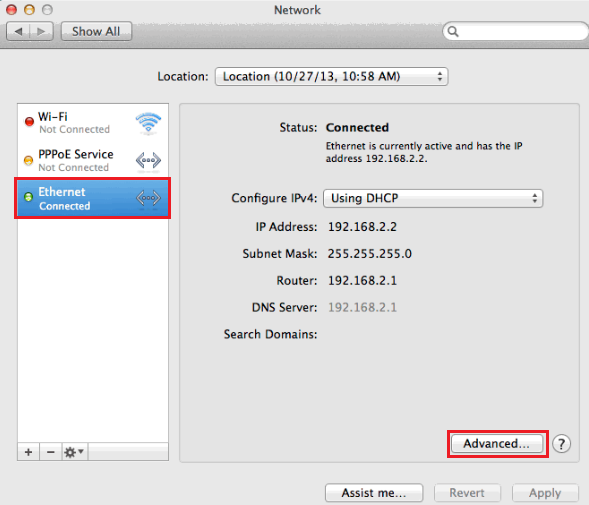
-
Select the DNS tab and then click the plus (+) icon in the lower left-hand corner.
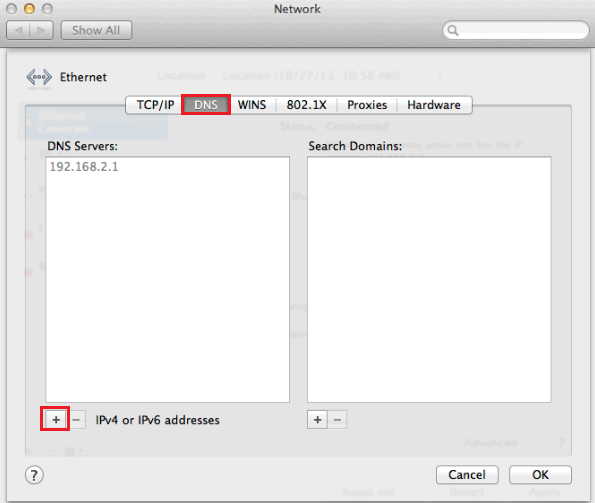
-
For DNS Servers, enter "203.12.160.35" and then hit OK to finish.
A TCP/IP reset can fix some browsing issues, particularly if your modem's default gateway address is starting with “169.254”.
Select one of the links below to jump to a query:
TCP/IP Reset in Windows
-
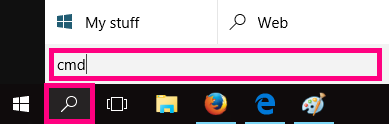
Hit Search and type "cmd" into the search bar.
-
Right-click on the Command Prompt app and select Run as administrator.
You may need to enter an administrator password before you can continue.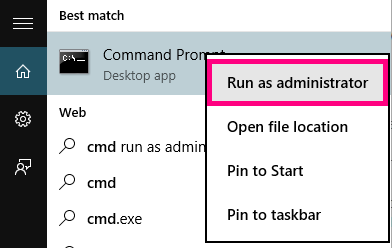
-
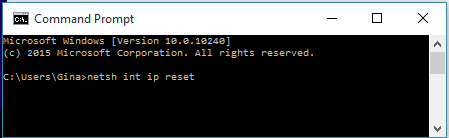
Type “netsh int ip reset” and then hit Enter on your keyboard.
-
Restart your computer to finish.
TCP/IP Reset in macOS
-
Hit the Apple icon in the top right-hand corner and select System Preferences.
-
Select Network.
-
Select your connected network (Ethernet or Wi-Fi) and then hit Advanced.
-
Select the TCP/IP tab and then hit Renew DHCP Lease.

-
Click OK to finish.
Every modem has a default gateway, which is a web page where you can log in and change your modem settings. You'll find the default gateway address on your modem's barcode sticker, but if it's not working, then these steps can help you find the default gateway or identify the issue.
Common default gateway addresses include 192.168.0.1, 192.168.1.1, 192.168.20.1, and 10.1.1.1.
Select one of the links below to jump to a query:
- How to find your default gateway address on Windows
- How to find your default gateway address on macOS
How to find your default gateway address on Windows
-
Make sure your computer is connected to your modem by Ethernet cable or Wi-Fi.
Note: Wi-Fi connections can't be over Guest Wi-Fi or Wi-Fi Protected Setup (WPS). -
Hit Search and type "cmd" into the search bar.
-
Open the Command Prompt app.
-
Type “ipconfig” and then hit Enter on your keyboard.
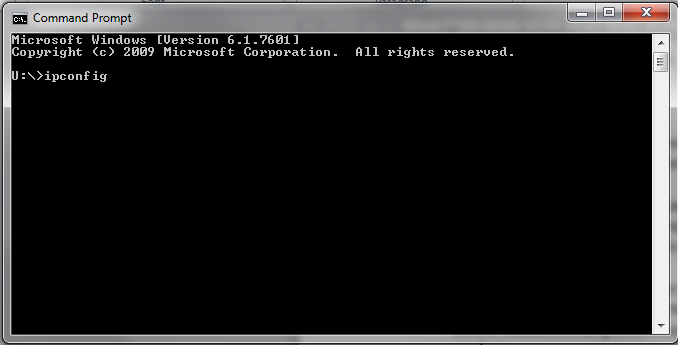
-
Scroll through the test results. If your computer is connected to your modem by Ethernet cable, look for a heading that says Ethernet adapter Local Area Connection.
If you're on Wi-Fi, look for Wireless LAN Local Area Connection.
Ignore any results that say “Media Disconnected” - these are saved settings for adapters that aren't currently being used. -
Your default gateway address will be listed next to Default Gateway, e.g. "192.168.0.1" means your default gateway address is "http://192.168.0.1".
Important: If the default gateway begins with “169.254”, then your modem isn't getting a response from the DHCP server. You should reset your TCP/IP settings and if the issue persists, reset your network adapter.
-
Open your web browser and go to your default gateway address. You should see a login page - you can find the default username and/or password on your modem's barcode sticker. If you have custom login details, you'll need to use those instead.
Don't see a login page? Check out Troubleshoot no communication between your modem and device.
Forgotten your custom login details? You'll need to factory reset your modem and set it up again.
How to find your default gateway address on macOS
-
Make sure your computer is connected to your modem by Ethernet cable or Wi-Fi.
Note: Wi-Fi connections can't be over Guest Wi-Fi or Wi-Fi Protected Setup (WPS). -
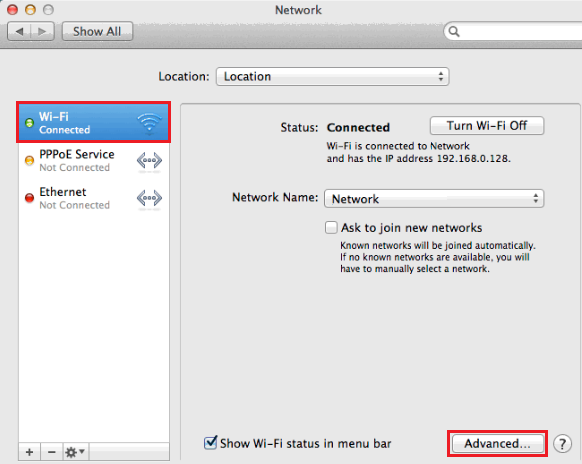
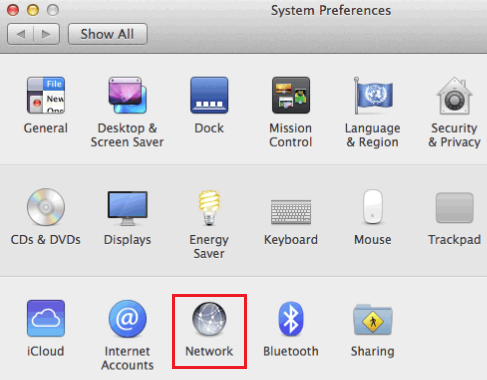
Hit the Apple icon in the top left-hand corner and choose System Preferences.
-
Select Network.
-
If your computer is connected to your modem by Ethernet cable, select Ethernet and your default gateway address will be listed next to Router, e.g. "192.168.2.1" means your default gateway address is "http://192.168.2.1".
If you're on Wi-Fi, select Wi-Fi, then hit Advanced and select TCP/IP. Your default gateway address will be listed next to Router, e.g. "192.168.2.1" means your default gateway address is "http://192.168.2.1".
Important: If the default gateway begins with “169.254”, then your modem isn't getting a response from the DHCP server. You should reset your TCP/IP settings and if the issue persists, restart Wi-Fi/Airport.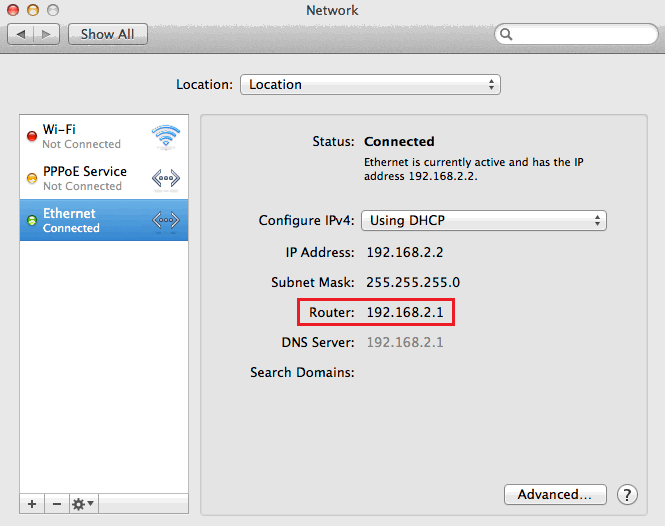
-
Open your web browser and go to your default gateway address. You should see a login page - you can find the default username and/or password on your modem's barcode sticker. If you have custom login details, you'll need to use those instead.
Don't see a login page? Check out Troubleshoot no communication between your modem and device.
Forgotten your custom login details? You'll need to factory reset your modem and set it up again.
A ping test checks how data packets are sent to a specific address using your internet connection, including how long it took and whether any packets were lost.
If you use PingPlotter, it will run a ping test and a traceroute at the same time.
Select one of the links below to jump to a query:
- Common addresses to ping
- PingPlotter on Windows
- PingPlotter on macOS
- PingPlotter on iOS (iPhone/iPad)
- Ping test in Windows
- Ping test in macOS
- Understanding ping test results
Common addresses to ping
| Address to ping | What is it? | Why ping it? |
| tpg.com.au | TPG's web address | To check that DNS is working on your computer. |
| 203.12.160.35 | One of TPG’s DNS servers | To check that TCP/IP settings are working on your computer. |
| 127.0.0.1 | A loopback test to your own computer | To check that there’s no issue with your computer’s network adapter or connection settings. |
PingPlotter on Windows
-
Download PingPlotter at: http://pingplotter.com/download
You don't need to buy a subscription, you can use the Free version. -
Open PingPlotter and hit the + (plus) icon to open a New Trace tab.
-
Type tpg.com.au or another address you want to to ping or traceroute, then hit Start.
-
Let the test run for at least 60 seconds, then hit Pause.
-
Hit the Print Screen (PrntScr) key on your keyboard to screenshot your test results. You can use CTRL+V to paste your screenshot into any text editor, image editor or email app.
PingPlotter on macOS
-
Download PingPlotter at: http://pingplotter.com/download
You don't need to buy a subscription, you can use the Free version. -
Open PingPlotter and type tpg.com.au or another address you want to ping or traceroute, then hit the Start.
-
Let the test run for at least 60 seconds, then hit Pause.
-
Use the Command ⌘+Shift+3 keys on your keyboard to screenshot your test results. You can use Command ⌘+V to paste your screenshot into any text editor, image editor or email app.
PingPlotter on iOS (iPhone/iPad)
-
Open the App Store and search for 'PingPlotter" to install PingPlotter.
You don't need to buy a subscription, you can use the Free version. -
Open PingPlotter and type tpg.com.au or another address you want to ping or traceroute, then hit Start.
-
Let the test run for at least 60 seconds, then hit Pause.
-
Hit the Share icon and select Screenshot.
-
You can choose to save your screenshot to Pictures, or share it by Mail.
Ping test in Windows
-
Hit Search and type "cmd" into the search bar.
-
Open the Command Prompt app.
-
Type “ping” then hit Space on your keyboard.
-
Type the address you want to ping, then hit Enter on your keyboard.
e.g. "ping tpg.com.au"
-
Wait for the ping results.

If a ping test fails, you'll get a "Request timed out", "Destination host unreachable", or "Transmit failed, error code #" messge instead of ping results. You may need to troubleshoot your internet if a ping test fails.
With some browsing issues, you may be able to ping a DNS server, but not a web address. If this is the case, you should try manually setting your DNS server.
-
To copy-paste your ping results: Highlight the text results and simply press the Enter key.
Note: For Windows 10, right-click in the Command Prompt window and select Mark to turn on the cursor. You can use the up/down arrow keys on your keyboard to move the cursor to the start of the text you want to copy.
Hold the Shift key and use the down/right arrow keys to highlight the text you want to copy, then hit the Enter key to copy the text.
Open Word, Notepad or any other text editor or email app and use CTRL+V to paste the copied text.
Ping test in macOS
-
Hit Search and type “network utility” in the search bar.
-
Open the Network Utility app.
You can also find this app at /System/Library/CoreServices/Applications.
-
Select the Ping tab and type the address you want to ping, then hit Ping.
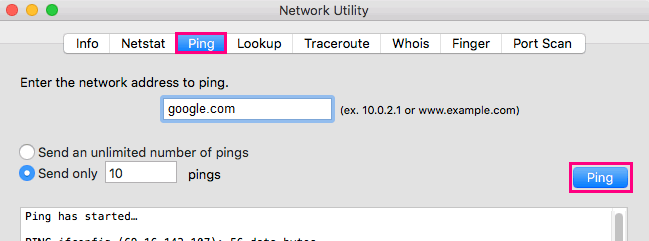
-
Wait for the ping results.
If a ping test fails, you'll get a "Request timed out", "Destination host unreachable", or "Transmit failed, error code #" messge instead of ping results. You may need to troubleshoot your internet if a ping test fails.
With some browsing issues, you may be able to ping a DNS server, but not a web address. If this is the case, you should try manually setting your DNS server.
-
To copy-paste your ping results: Click and drag the cursor to select the text you want to copy, then right-click and select Copy, or hit Command ⌘+C on your keyboard.
Open TextEdit or any other text editor or email app and use Command ⌘+V to paste the copied text.
Understanding ping test results
Ping test results are similar for both Windows and macOS.
-
If a ping test is successful, it means that your computer was able to connect to that address.
-
You’ll see a "reply" listed for each data packet sent in the ping test, and how long it took.
A Windows ping test will typically send 4 packets; a macOS ping test may send more.
-
The statistics will show if any data packets were lost during the ping test.

"Connect Outstanding" means your TPG order is blocked because there's already an active phone or internet service at your address.
To get the service transferred from the previous owner, we'll need you to send us Proof of Occupancy.
- Scan or take a photo of one the following Proof of Occupancy documents, which must include your name and the same address as your internet order:
- A fixed utility bill (e.g. water, electricity, gas); or
- An insurance document (e.g. Business or Home & Contents); or
- A Certificate of Title of the land; or
- A Council Rates notice; or
- A signed lease/rental agreement (must include the lease start date).
- Open a new email and attach your Proof of Occupancy.
- Enter a subject line of "nbn Proof of Occupancy", followed by your TPG username.
You can find your TPG username on emails from us about your TPG order. - In the body of the email, include your name and the address for your internet order, including the suburb and postcode.
- Send the email to nbnpod@tpg.com.au
Once your Proof of Occupancy is accepted, we'll proceed with your TPG order. Most services can be activated within 48 hours.
Can't provide Proof of Occupancy? This could result in connection delays, or we may be unable to complete your order. Please call us on 1300 023 575 to discuss your options.
Just like road traffic, internet congestions happens when too many people are using the same connection. Only so much internet data can be transferred at one time, and things get slower when there's congestion.
Here's what you need to know about the different types of internet congestion and some tips to avoid it.
Select one of the links below to jump to a query:
Network congestion
Network congestion is temporary, and it depends on the current usage of the entire network. When we say 'network', this can mean any part of the physical network infrastruture that connects the internet outside your house, across Australia, and worldwide.
Sometimes network congestion can be a result of an outage or planned maintenance on this infrastructure. Websites like Is It Down Right Now? will help you check. If you're particularly tech-savvy, running a traceroute can show you which servers are running slow.
You're most likely to have experience network congestion in the evenings, when everyone is more likely to be at home and using their internet.
Network congestion isn't a 'you' problem and one person's usage can't make or break a whole network in terms of congestion, so don't worry too much about how you use your internet service. We're always working to improve performance on parts of the network that are within our control.
Local congestion
Local congestion is all about the connections between your devices and your modem.
If too many devices are apps are running at the same time, there may not be enough internet speed (or bandwidth) to go around. Think of bandwidth like a pizza - if you cut it in half, the slices are massive. If you cut it into ten slices, the slices are little.
Note: Realistically, the size of the pizza slices will vary depending on the abilities of the connected device or the type of app its running, but you get the idea.
If you're worried about local congestion, try these tips:
- Try to schedule big downloads or game patches to run overnight or anytime you're not using your internet for other stuff.
- Close any unnecessary background apps and turn off any internet-connected devices you're not using.
- Check our website or give us a call to see if there's a faster internet plan or a faster type of interent service available at your address.