BizPhone orders cannot proceed unless these tests are completed, so it's important to get them done at your earliest convenience.
Running the BizPhone Test
-
Make sure that no other programs or downloads are running while the test is being performed as this may affect the results.
-
Select one of the links below to load the test:
- Recommended - Java version (requires Java to be installed and updated on your computer)
- HTML5 version (requires VisualWare Browser Compatibility Service (BCS) for Windows or Mac to be installed on your computer) -
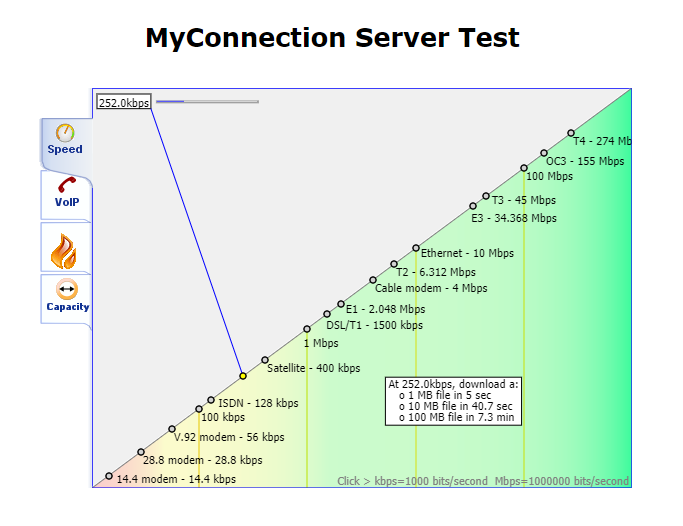
Once the test loads, click Start Test. The test will automatically run to test your broadband speed...
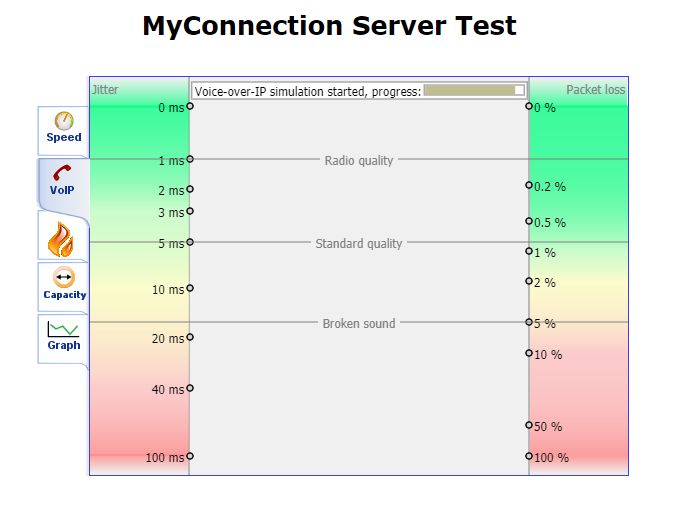
Latency...
Port blocking...
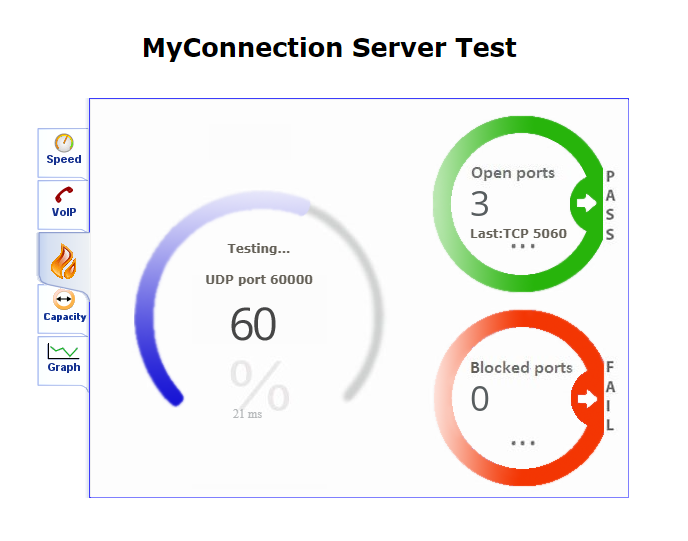
And packet throughput capacity:

-
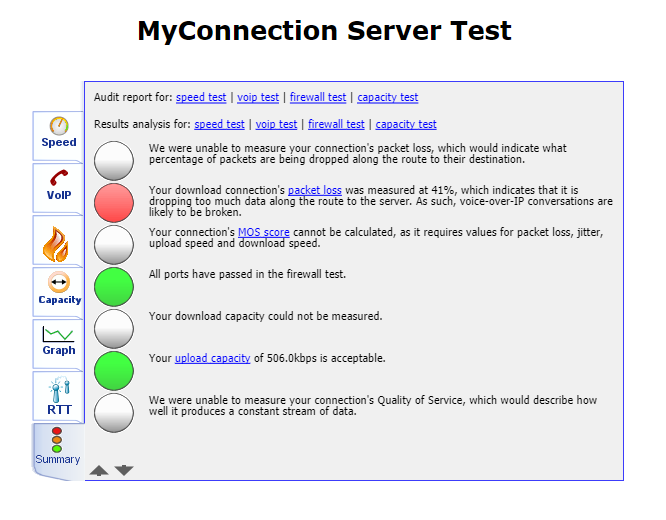
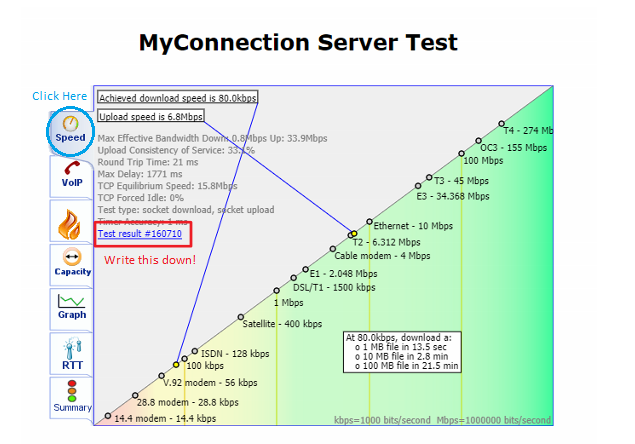
Once the test has finished running, you'll see a Summary page like the example below.
-
Select the Speed tab and write down the Test result number shown on this page.
-
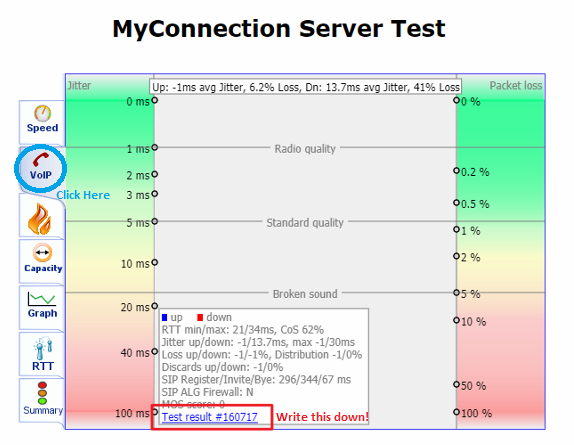
Select the VoIP tab and write down the Test result number shown on this page.
-
You should now have two different reference numbers. Please reply to the email your received from our BizPhone Provisioning Team with these numbers so that we can check your test results.
-
Once your BizPhone Connection test results have been checked, we'll contact you about the next steps for your BizPhone order.
Common issues that may delay your BizPhone order
The following issues must be addressed before your BizPhone order may proceed. If the BizPhone Connection Test identifies any of these issues, we'll contact you to discuss the matter and see if it can be rectified.
- SIP ALG Enabled: SIP ALG is a protocol that attempts to make VoIP packets flow smoothly. Some modems have this setting on by default and it will need to be disabled, with the tests rerun.
- Port Blocking: Port blocking will result in your BizPhone not operating, as it cannot communicate with the needed SIP servers. We will tell you which ports need to be open so you can make arrangements with your IT Support technician.
- Insufficient Speed/Quality: Internet issues may be present on the line and you should contact your Internet Provider to troubleshoot or see if more suitable internet technologies are available in your area.
You can change your internet plan at any time in My Account.
-
Log in to My Account and hit Change Plan.
Never used My Account before? Check out An Introduction to My Account.
-
Under "Want to try a new plan?", hit Change Plan.

-
Choose your new plan from the list of available options and then hit Next.
-
You'll see a summary of your plan change. Tick the box to agree to the terms and conditions and then hit Submit.

-
We'll send you an email and SMS to confirm when your plan change is done.
If your plan will renew in less than 7 days, your plan change may be delayed until the following month.
You can update your contact details, add new contacts or remove existing contacts at any time in My Account.
Important: If you're updating your address because you're moving home, please contact us ASAP so we can help you move your TPG services. Check out our Moving Home page for everything you need to know.
Select one of the links below to jump to a query:
- How to update your contact details in My Account
- How to add, edit or remove an additional contact in My Account
How to update your contact details in My Account
-
Log in to My Account and hit About Me, then Edit contact information.
Never used My Account before? Check out An Introduction to My Account.
-
Update your Address, Phone, or Email as needed and hit Update contact information to save.
You won't be able to save if Phone number is left blank.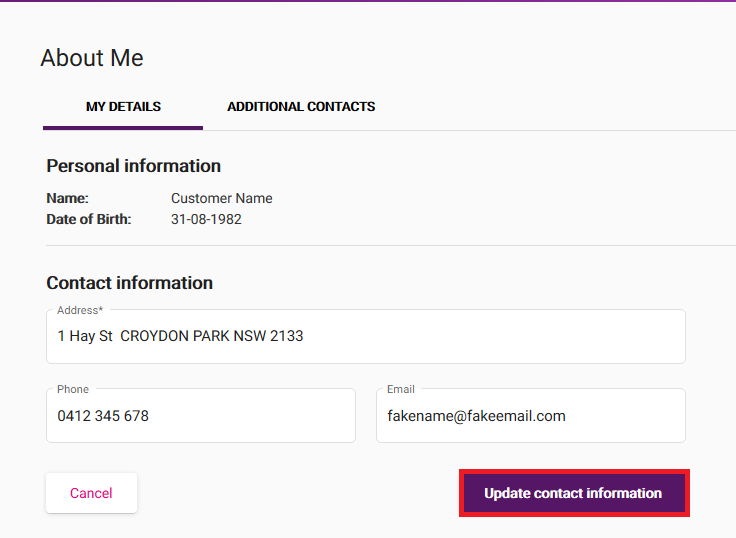
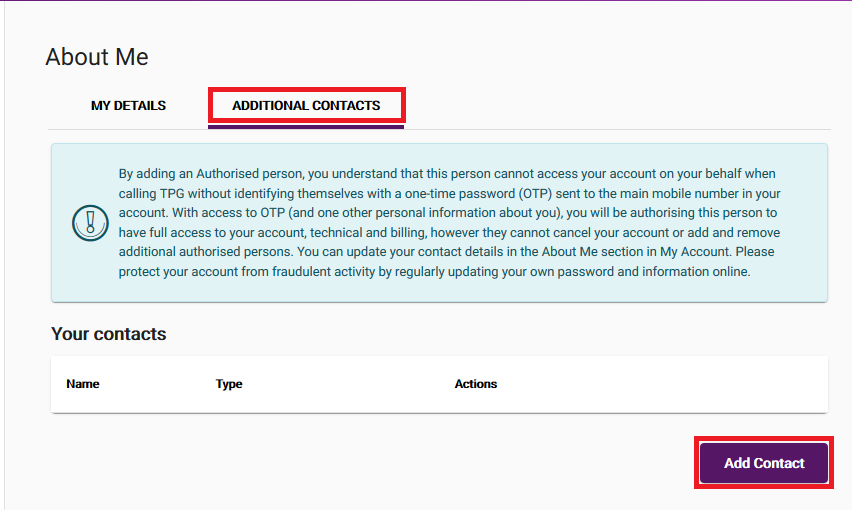
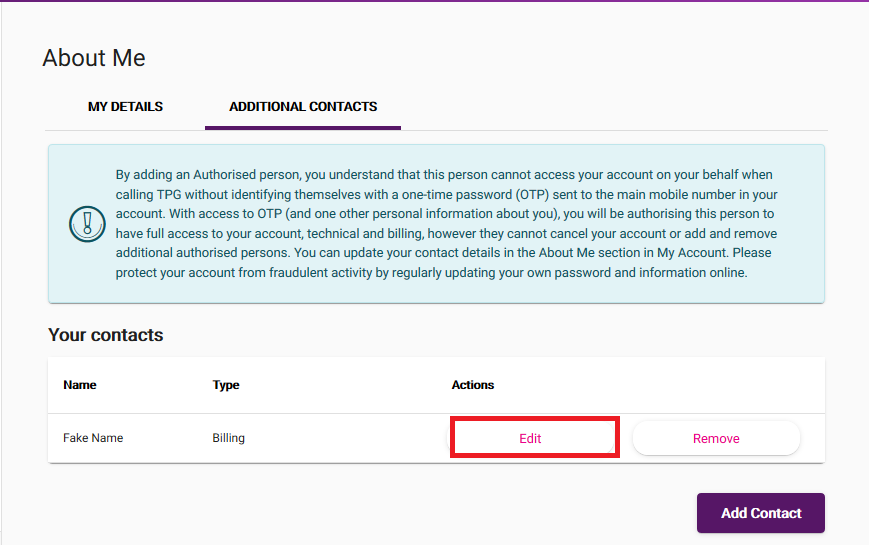
How to add, edit or remove an additional contact in My Account
-
Log in to My Account and hit About Me, then go to the ADDITIONAL CONTACTS tab.
-
To add a contact, hit Add Contact.
-
Fill out the form with the Contact Type, Date of Birth, First name, Last name, Address, Phone and Email, then hit Add additional contact to save.
You won't be able to save if Address is left blank.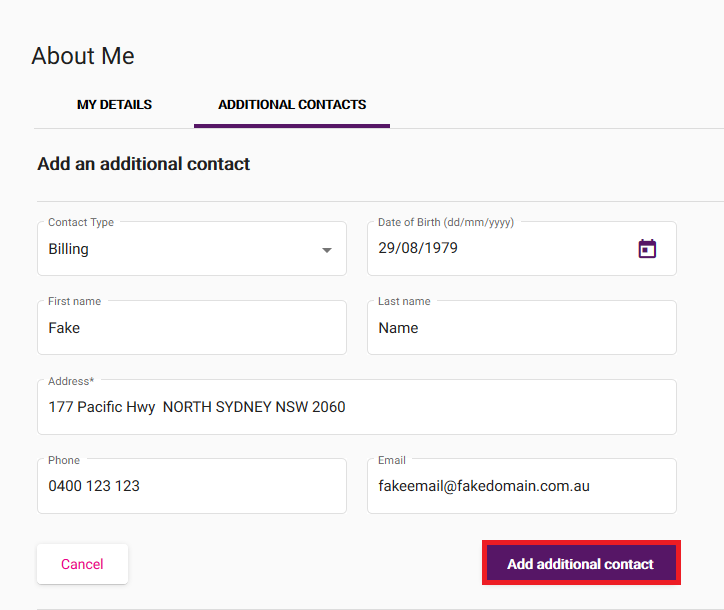
-
Once you have additional contacts, you can hit Edit to update their details at any time on the ADDITIONAL CONTACTS tab.
-
To delete an additional contact, just hit Remove, then Delete Contact to confirm your decision. A Delete Contact button is also available on the Edit page.

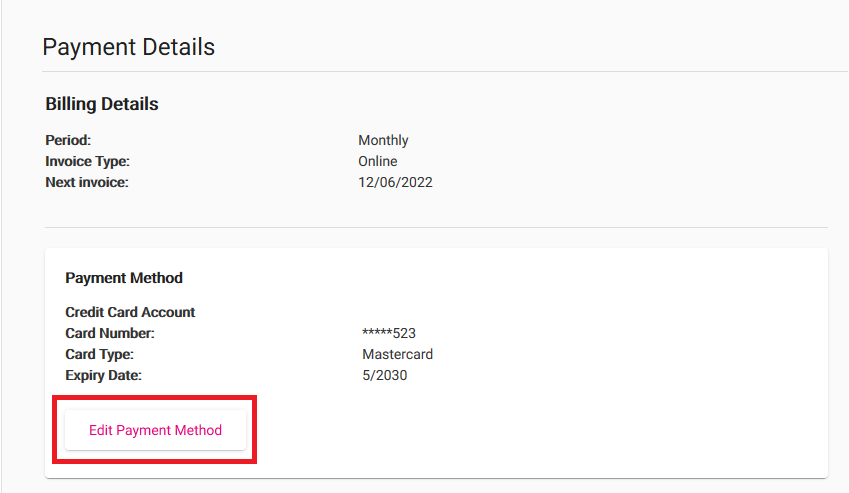
It’s easy to update your payment details in My Account. Your payment details will be used to auto-pay your TPG invoice each month.
Never used My Account before? Check out An Introduction to My Account.
Please note: If you have an overdue invoice, saving new payment details will trigger an automatic payment, so make sure you’re ready to pay before you save.
-
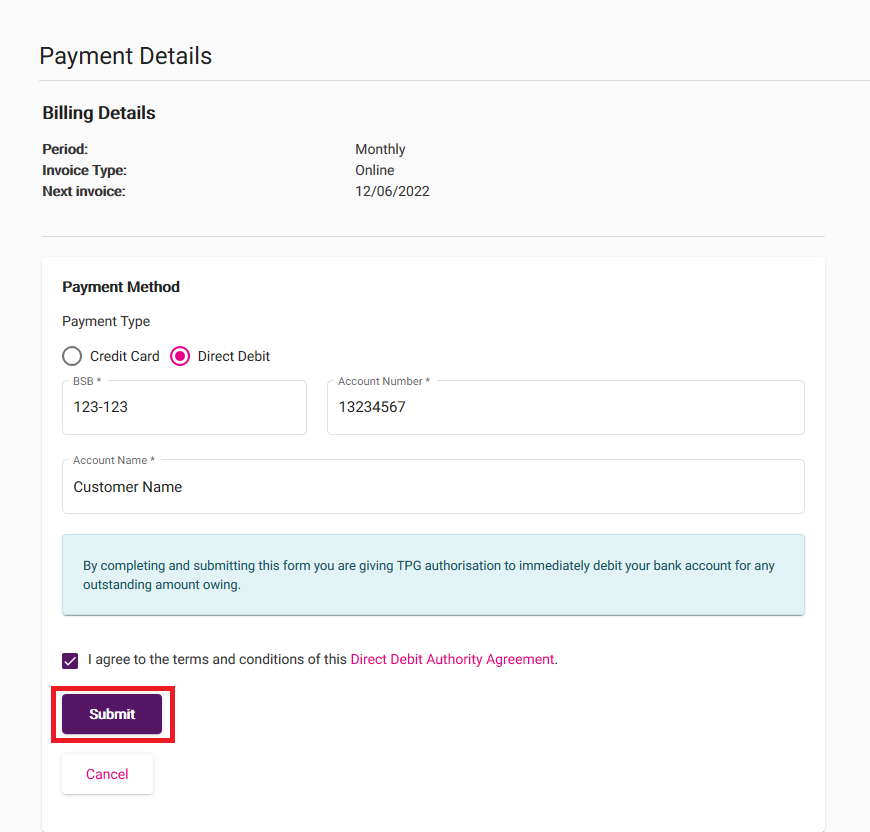
Log in to My Account and hit Payment Details.
-
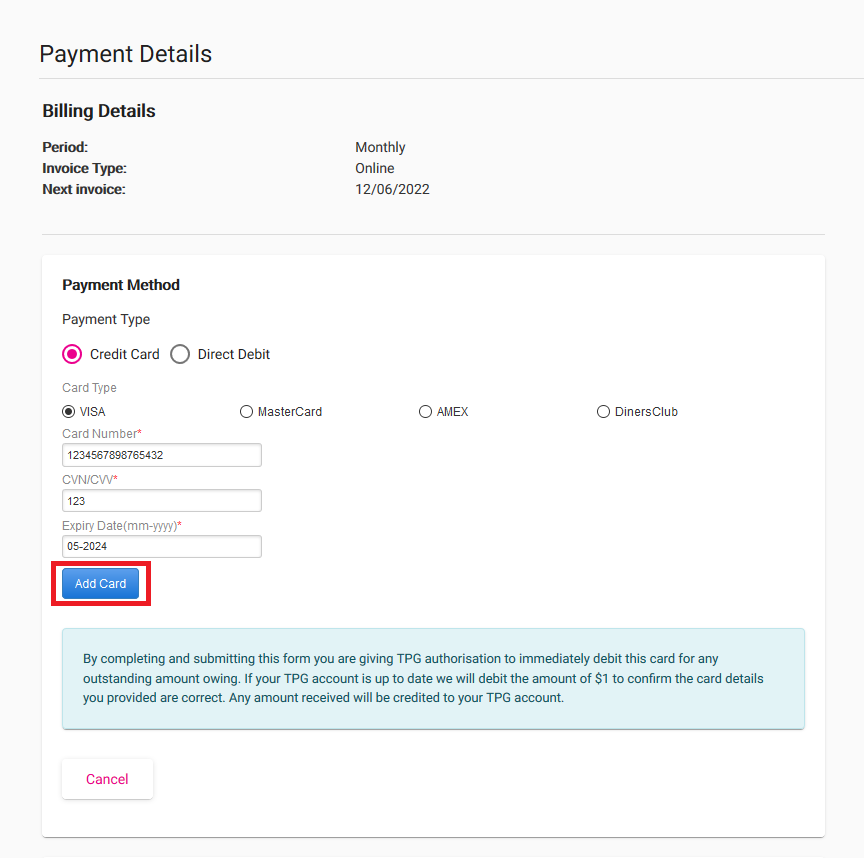
You’ll see your current Payment Method. Hit Edit Payment Method.
-
Choose Credit Card or Direct Debit, then fill out the required details:
- For Credit Card (which includes debit cards) you’ll need your Name on Card, Card Number, Expiration Date and Security Code. Any surcharges that apply will be shown on screen.
- For Direct Debit, you’ll need your BSB, Account number, and Account name. You’ll also need to agree to the Direct Debit Authority Agreement.
-
Hit Add Card or Submit to finish.
Can I use a gift card as my payment details?
Sorry, but your payment details must use an Authorised Deposit-taking Institution (ADI). Gift cards such as Visa Debit gift cards aren’t considered ADIs, so they can’t be used as your TPG payment details.
You can make a payment at ay time in My Account. If you don't have an outstanding invoice, then any amount you pay will become a credit on your TPG account to be used on future invoices.
Never used My Account before? Check out An Introduction to My Account.
Please note: If you need to change your payment details first, check out Update payment details in My Account.
-
Log in to My Account and hit Make a payment.
If there's any Amount Payable on your TPG account, you'll see it next to this button.
-
Select Make a payment.
-
If your TPG account has an Amount Payable, you'll be asked if you want to pay the full outstanding balance. Hit Yes to pay using the payment details save on your TPG account.
If you want to pay a different amount using a credit card, hit Not now.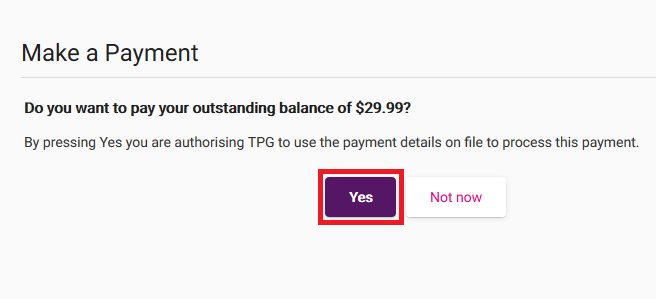
-
If you chose to pay a different amount, enter the amount in the Credit/Charge Amount box, then hit Proceed.
-
Fill out the required credit card details, including your Name on Card, Card Number, Expiration Date and Security Code.
Any surcharges that apply will be shown on screen. -
Hit Make payment to finish.
You can get your invoices at any time from My Account. This includes all previous invoices if you need them for tax purposes.
Never used My Account before? Check out An Introduction to My Account.
-
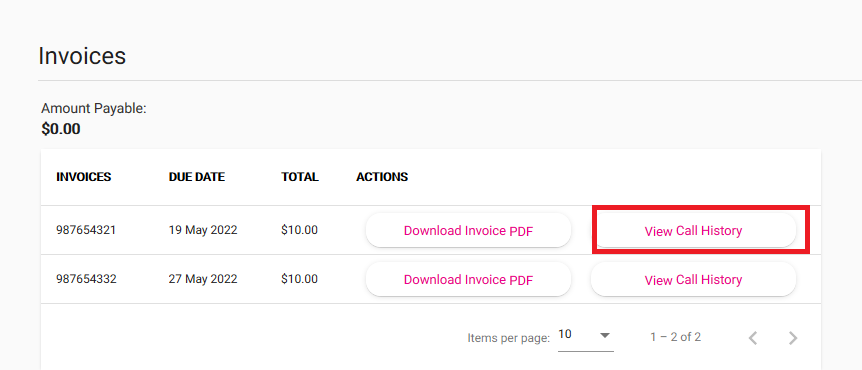
Log in to My Account and hit Invoices.

-
You'll see a list of all your TPG invoices. To download any invoice as a PDF file, hit Download Invoice.
To view PDF files, install Adobe Reader on your device.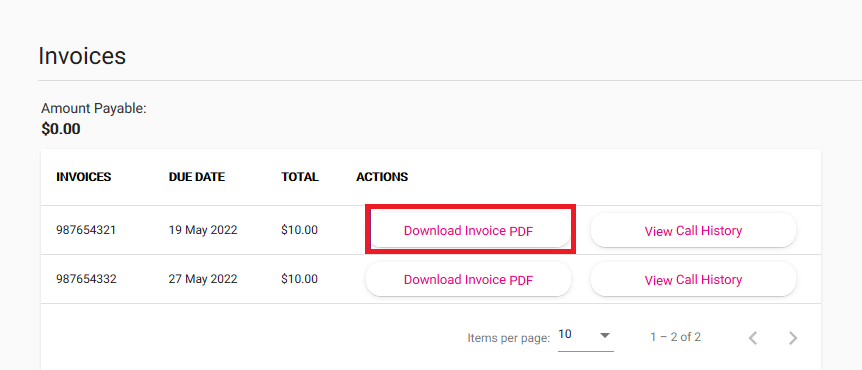
-
If you want to see the phone calls included on any invoice, hit View Call History.
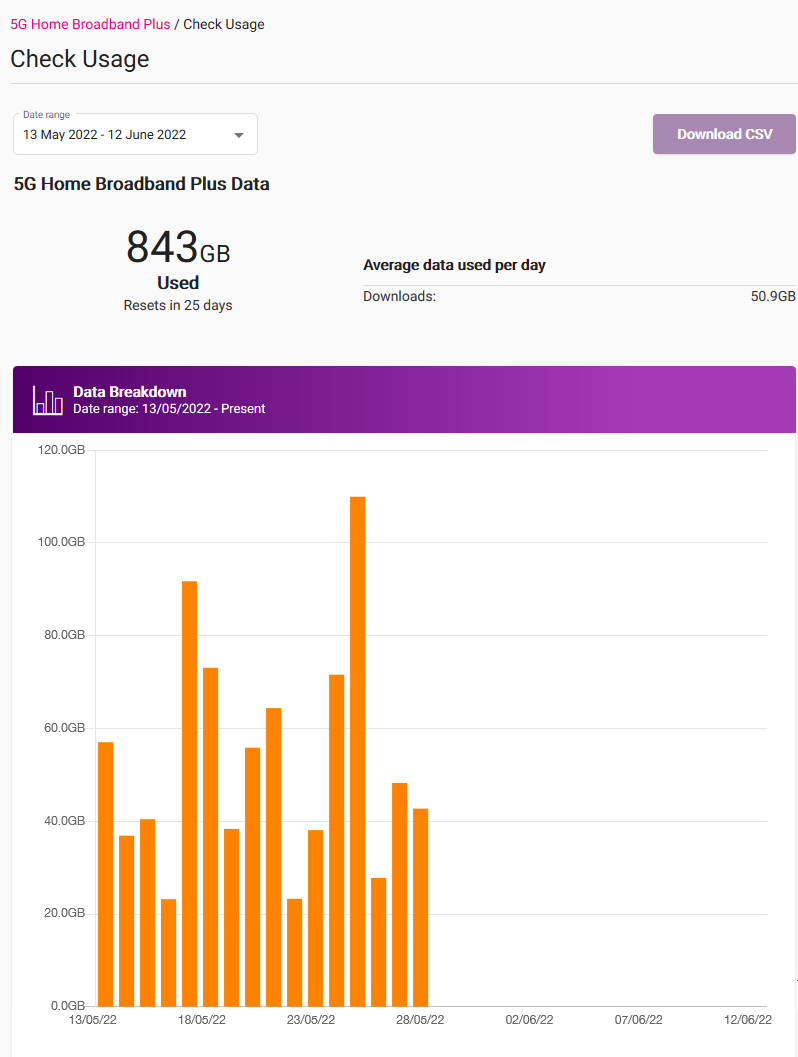
You can check the data usage for your TPG internet service at any time. If you have a monthly data plan instead of an unlimited data plan, we'll also let you know when you've hit 50%, 85% and 100% of your monthly data.
Data usage isn't available if you have an unlimited data plan.
-
Log in to My Account and hit Volume Usage.
Never used My Account before? Check out An Introduction to My Account.
-
You'll see the usage for your current billing period by default, including a graph to break down daily usage.
-
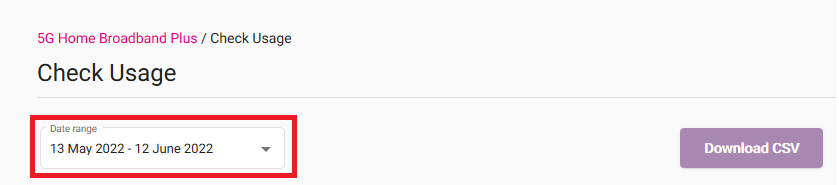
To see older usage, choose from the Date range drop-down menu.
My Account lets you manage your TPG account and services online, so you can take care of a lot of stuff without needing to call us.
This guide will show you how to log in to My Account and what do can do in it.
Select one of the links below to jump to a query:
How to log in to My Account
-
Go to My Account at: https://www.tpg.com.au/myaccount - or just hit the My Account button on the TPG website.
-
Log in with the username and password for your TPG account. You'll find your username on emails from us about your TPG order, or your TPG invoice.
Forgotten your TPG password? You can reset it at: https://tpg.com.au/password. -
A one-time passcode will be sent to the mobile number listed in your account’s contact details - just enter this passcode to finish logging in.
If you can't log in or get your one-time passcode, please contact us. We can help you access your TPG account after an ID check.
What you can do in My Account
Get an overview of your account details

The top section of My Account will show you your:
- Account holder name - this is the person who gets your TPG invoice;
- Username - you use this to log in;
- Customer ID - also known as an account number, this will help us find your TPG account if you need to contact us;
- Amount Payable - this shows if any payment is due.
Manage your TPG services
Your main TPG service is shown by default. If you have multiple TPG services, you can click your service to choose which one you want to manage.
The account management options you see will depend on the type of service you're managing.
Mobile services
- Check your call usage
- Check your data usage
- Top up your Prepaid Balance
- Change your mobile plan
- Manage Voicemail, Call Barring and Call Forwarding settings
- Turn International Roaming on or off
- Request a PUK code for a locked SIM
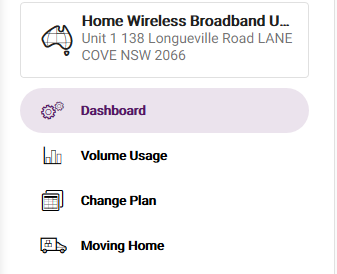
5G Home Broadband or Home Wireless Broadband services
- Check your data usage
- Change your interent plan
- Request to move your service to a new address
Manage your TPG Account
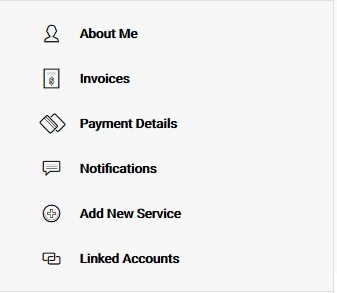
My Account gives you the following options to keep your TPG account information up-to-date:
- About Me - Here you can update your contact details, add or remove additional contacts and change the password you use to log in to My Account.
- Invoices - Get your TPG invoice, including past invoices if you need them for tax purposes.
- Payment Details - Update your payment details or change the way you get your invoice.
- Notifications - Check out a history of notices we've sent you about your TPG account.
- Add New Service - Order a new service for your TPG account.
- Linked Accounts - Manage other TPG accounts that are linked to yours - learn more
Log out

The logout button is at the bottom of the menu, and the top right-hand corner of the screen. It's important that you log out once you're done if you're using a public computer, like the ones at libraries, or any device that you share with another person.
Here’s what you need to know about speeds on TPG nbn.
Select one of the links below to jump to a query:
- How we advertise nbn® speeds
- How to choose the right nbn® plan for your needs
- Factors that may affect your nbn® speed and connection
How we advertise nbn® speeds
We advertise Typical Evening Speeds for our nbn plans. Typical Evening Speeds are subject to change and are measured 7PM-11PM local time. Speeds are not guaranteed and may vary.
Note: TPG Business nbn plans measure Typical speeds during weekday business hours (9AM – 5PM local time).
TPG nbn® Fibre Typical Evening Speeds
This includes nbn FTTB/FTTN, nbn FTTC, nbn FTTP & nbn HFC services.
| nbn Speed Tier | Typical Evening download Speed | Typical Evening upload Speed |
|---|---|---|
| NBN12 | 12Mbps | 0.8Mbps |
| NBN25 | 25Mbps | 4Mbps |
| NBN50 | 50Mbps | 17Mbps |
| NBN100 | 100Mbps | 17Mbps |
| NBN Home Superfast* | 250Mbps | 21Mbps |
| NBN Home Ultrafast* | 800Mbps | 40Mbps |
*This speed option is available on nbn FTTP & nbn HFC only. A high speed modem is required.
TPG nbn® Wireless Typical Evening Speeds
| nbn Speed Tier | Typical Evening download Speed | Typical Evening upload Speed |
|---|---|---|
| NBN12 | 10Mbps | 0.9Mbps |
| NBN25 | 20Mbps | 3.8Mbps |
How to choose the right nbn® plan for your needs
If you already have TPG nbn, you can change your nbn plan in My Account.
nbn Fibre includes nbn FTTB/FTTN, nbn FTTC, nbn FTTP & nbn HFC services.
| Speed | Available on these nbn types | Best for |
|---|---|---|
| NBN12 | nbn Fibre nbn Wireless |
For basic internet use like web browsing and email. |
| NBN25 | nbn Fibre nbn Wireless |
For small households and light entertainment needs. |
| NBN50 | nbn Fibre | For households with multiple devices and quality streaming. |
| NBN100 | nbn Fibre | For entertainment lovers and online gamers. |
| NBN Home Superfast* | nbn FTTP & nbn HFC only | For large households with more devices connected. |
| NBN Home Ultrafast* | nbn FTTP & nbn HFC only | For heavy-duty internet users and small businesses. |
*A high speed modem is required.
Factors that may affect your nbn® speed and connection
Some factors only apply to specific types of nbn connections.
| Factor | nbn Wireless | nbn FTTB/N & nbn FTTC | nbn FTTP & nbn HFC |
|---|---|---|---|
|
The quality of your modem, cables and devices |
✅ | ✅ | ✅ |
|
Network Congestion |
✅ | ✅ | ✅ |
|
Weather |
✅ | ✅ | ✅ |
|
Wi-Fi signal interference |
✅ | ✅ | ✅ |
|
How many devices you have connected |
✅ | ✅ | ✅ |
|
Which content is being accessed |
✅ | ✅ | ✅ |
|
nbn® Infrastructure
|
✅ | ✅ | ❌ |
|
nbn® Wireless Signal interference |
✅ | ❌ | ❌ |
|
nbn® Wireless Fair Use Policy Enforcement |
✅ | ❌ | ❌ |
|
Latency
|
✅ | ❌ | ❌ |
Checking the status lights on your indoor nbn Connection Box (NCB) for nbn FTTP can be useful for troubleshooting.
You may need to check the Serial Number on your NCB to complete your order.
Select one of the links below to jump to a query:
- Lifting the nbn FTTP Connection Box cover
- Where to find your nbn FTTP Connection Box Serial Number
- nbn FTTP Connection Box Status lights
- Are the lights behaving strangely?
Lifting the nbn FTTP Connection Box cover
If your NCB has a cover, you can open it by, gently prising the cover away from the two clips on the bottom, then lifting the cover upwards.
Once the cover is lifted, you'll see the status lights at the top of the NCB and the ports are on the bottom.

Where to find your nbn FTTP Connection Box Serial Number
The Serial Number for your NCB is listed next to S/N on its barcode sticker.

nbn FTTP Connection Box Status lights

| Light | State | Meaning | |
| POWER | Off | No power. | |
| Red | Using backup battery power from the Power Supply unit (if you have one). | ||
| Green | Your NCB has power. It's normal if this light looks more orange/yellow than green. | ||
| OPTICAL | Off | Your NCB is disabled. Please call us on 1300 997 271 as we'll need to lodge a ticket with nbn®. | |
| Red | No connection to the network. Try troubleshooting. | ||
| Green | Successful network connection. This light will flash during data transfer. | ||
| ALARM | Off | No devices are connected. | |
| Red | Issue detected. Try troubleshooting. | ||
| Green | Your NCB is working with no issues detected. | ||
| UNI-D 1/2/3/4 | Off | Nothing is plugged into this port. Only one UNI-D port is active for each nbn service - usually UNI-D 1. If you don't know which UNI-D port to use, call us on 1300 997 271 and we'll help you. | |
| Orange | A device capable of up to 1000Mbps is plugged in. This light will flash during data transfer. | ||
| Green | A device capable of up to 10/100Mbps is plugged in. This light will flash during data transfer. | ||
| UNI-V 1/2 | Off | There is no nbn Phone service, or it's not currently being used. Note: Fibre Phone is no longer sold as of 23 May 2024. | |
| Green | One or more nbn Phones are off the hook (typically because they are being used). | ||
| Flashing | One or more nbn Phones have been off the hook for more than an hour. If no one is on a long phone call, hang up the phone. | ||
| UPDATE | Off | It's normal for this light to be off. | |
| Red | Your NCB has failed to download an update. Please call us on 1300 997 271 as we'll need to lodge a ticket with nbn®. | ||
| Green | Your NCB is currently downloading an update with no issues. | ||
Are the lights behaving strangely?
If you're seeing some weird behaviour such as lights for empty UNI-D ports turned on or flashing, have there been recent lightning storms in your area?
If you think your NCB, cables or other nbn equipment have been affected by a lightning strike, please call us on 1300 997 271.