Your TPG services may be suspended if you have an overdue invoice, or in response to a security incident. Here's how to get unsuspended if that happens.
For more info about suspensions, see Consequences of Restriction, Suspension or Disconnection.
Select one of the links below to jump to a query:
- How to unsuspend your TPG services (Overdue invoices)
- How to unsuspend your TPG services (Security incident)
How to unsuspend your TPG services (Overdue invoices)
-
If your TPG invoice isn't paid, we'll send you an email/SMS telling you the earliest date your services will be suspended. If you pay the invoice before that date, your services won't be suspended.
-
If your invoice isn't paid and your TPG services are suspended, you can Make a payment in My Account or call us on 13 14 23.
Having difficulties making a payment? Please see our Financial Hardship Policy. -
Once your payment has cleared, your TPG services should unsuspend automatically within one business day.
How to unsuspend your TPG services (Security incident)
-
When a security incident happens, we suspend services ASAP to prevent further abuse or unauthorised access. You'll be notified after your services are suspended, and we'll try to call you using the contact number(s) on your TPG account.
-
We'll explain anything you need to do to help secure your account, such as changing account or Wi-Fi passwords, or running antivirus and malware scans.
-
Once we've spoken to you to verify your identity and made sure that your TPG account is secure, your TPG services may be unsuspended.
For more advice about how to stay safe online, see Scams and Hoaxes.
To view our Domestic and Family Violence Position Statement, click here. Further support will be available on or before 1 January 2026.
If you’re experiencing domestic or family violence, we’re here to help.
We understand that having access to communications can be vital for those who are experiencing or have been impacted by domestic or family violence. You can talk to us about how we may be able to assist you in staying connected - just call 13 14 23 (24/7).
Keeping your mobile number
If you’re the not the account owner but want to be able to keep your mobile number, we may be able to help you in some cases.
Please give us a call on 13 14 23. Our team may be able to assist by transferring your mobile number into your name.
We will need you to do the following:
- provide us with copies of documents that can verify your identity, such a drivers licence or Medicare card;
- provides us with supporting documents including a duly witnessed Statutory Declaration setting out you are or have been the subject of domestic or family violence and where necessary, an AVO, police report, court order or a letter from women’s shelter, financial counselor or community advocate; and
- demonstrate that you are using a device that is associated to the relevant mobile number.
We’ll tell you how to do this. Once the above is received or established and we have verified your identity and circumstances, we will work with you to determine, where available, the most suitable process to keep your mobile number.
Financial hardship
If you’re experiencing financial hardship due to domestic or family violence, you can speak to us about applying for financial hardship assistance. Please see our Financial Hardship Policy for more information.
Unwelcome communications
If you’re receiving unwelcome calls or messages via a service you have with us, we may be able to assist. For information on what to do if you’re getting unwanted phone calls to your home phone number, see our Unwanted Phone Calls page. Please be aware that you can also block the number from which the unwelcome communications originate by using to your phone's own features or by downloading an app to restrict the calls and messages you receive. If you are receiving life threatening communications, please report these to the police immediately.
Additional support services
- 1800RESPECT
Provides free counselling and support services for domestic, family, and sexual violence. Call 1800 737 732, chat online, or text.
https://www.1800respect.org.au/
- Ask Izzy
Ask Izzy connects people in need with essential services, including family violence support.
https://askizzy.org.au/
- Lifeline
Lifeline offers crisis support and suicide prevention services. Call 13 11 14, text, or chat online.
https://www.lifeline.org.au/
- MensLine Australia
Helps men navigate a variety of matters, including family violence. Call 1300 789 978.
https://mensline.org.au/
- 13YARN Australia
Provides free, confidential, 24/7 Aboriginal & Torres Strait Islander Crisis Supporters. Call 13 92 76.
https://www.13yarn.org.au/
- Full Stop Australia
Offers free, confidential, 24/7 trauma specialist counselling to people of all genders who have been subject to sexual, domestic and family violence. Call 1800 385 578.
https://fullstop.org.au/
This article provides information about the consequences if we, TPG Internet, exercise our right to restrict, suspend or disconnect one or more of your services for credit or debt management reasons.
We will make several attempts to contact you via email and/or SMS regarding any credit or debt management issues for your services. A notice will be sent to you in advance of any restriction, suspension or disconnection occurring.
If you are experiencing difficulties making this payment, then please see our Financial Hardship Policy for information about your options and how to speak to someone about your circumstances.
What are the consequences if my service is restricted?
Service restrictions are typically related to spend management tools and may occur when you have used 100% or more of your service inclusions, such as data. Restrictions do not necessarily indicate that your services are at risk of suspension or disconnection.
If one or more of your services are restricted, you will not be able to use select features of the services.
For example, if you have a Mobile service and have used all of the monthly mobile data included in your plan, the ability to use mobile data will be restricted and you won't be able to access the internet. Other features of the service, such as receiving calls/SMS and making calls/SMS that are part of your plan’s included value, will remain available.
You will need to wait until your next billing period begins for the restriction to be removed. Alternatively, you may choose to top up your Prepaid Balance in My Account to purchase a mobile data block.
What are the consequences if my service is suspended?
If one or more of your services are suspended, you will not be able to use those services.
For example, if your suspended service is a fixed or mobile voice service, you won’t be able to make calls (except to emergency services like 000) on your phone or handset or use mobile data. If your suspended service is an internet service, you won’t be able to connect to the internet or use services that require connection to the internet, like VoIP.
You may not purchase additional services while one or more of your services are suspended. Ongoing monthly plan charges will still apply while the service is suspended (excluding Mobile and 4G/5G Home Broadband services).
How can I get my services unsuspended?
- Mobile and 4G/5G Home Broadband services: You will need to pay the amount to renew your prepaid service before the suspension is removed.
- Other services: You will need to pay all overdue amounts owing before the suspension is removed.
Restoration of your service can take up to 1 business day after payment has been received.
Failure to pay after services are suspended may lead to your services being disconnected.
What are the consequences if my service is disconnected?
Unlike suspension, disconnection of your service is permanent.
Disconnection means you won’t be able to use any features of your services, including internet access and making or receiving any calls on phone services (for some fixed line services, even calls to emergency services like 000 cannot be made or received after disconnection).
You will need to reapply for new services, which may incur costs. Please note that following disconnection, the plan for your particular service may no longer be available, and your username or phone number may change. Any bundled discount entitlements will also be forfeited.
We may also require you to immediately stop using and return to us, or allow us to remove, any equipment or material belonging to us. We may delete all of your data from any storage media (you are solely responsible for backing up your data, such as voicemail messages).
- Mobile and 4G/5G Home Broadband services: You will still have to pay any applicable cancellation fees.
- Other services: We will send you a final invoice requesting payment of all outstanding charges incurred before disconnection, including any applicable cancellation fees. Failure to pay may affect your ability to reapply for a new service with us.
How to make payment
You can pay your outstanding amount by selecting "Make a payment" in My Account.
If you wish to discuss your account, please contact our Customer Service team via email or call 1300 993 011 (Monday - Friday 8am - 8pm, Weekends & Public Holidays 9am - 6pm).
We do not offer priority assistance, nor support for medi-alert services and monitored alarm systems. Priority assistance is offered by Telstra for people who may be reliant on a telephone service because of a serious medical condition. If you have a medi-alert or priority assistance service or believe that you are eligible, please consider this before proceeding with your order.
Bandwidth control or Quality of Service (QoS) stops your modem trying to upload faster than the speed of your nbn plan, which can cause data packets to be lost.
TPG modems handle bandwidth control automatically, but some third-party modems may need changes in their setting to turn on bandwidth control.
Having trouble following this guide for your modem? Please check the manufacturer's website or run a Google search for a more specifc guide.
-
On a device that's connected to your modem, open your web browser and go to your modem's default gateway address, which can be found on its barcode sticker (e.g. http://192.168.1.1).
Using a PC or Mac? You can also follow this guide to find your modem's default gateway address. -
Log in with the default username and password found on your modem's barcode sticker. If you have custom login details, use those instead.
Some modems don't have a username and just use a password. -
If you see any option for Advanced settings, hit it.
-
Find the bandwidth control setting. This is most likely called QoS or Bandwidth/Traffic control.
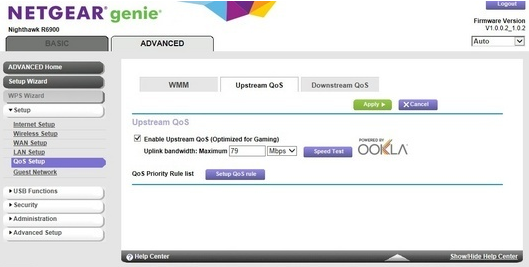
- Ensure that upstream bandwidth/QoS is enabled and set the bandwidth maximum according to your nbn plan:
- NBN12 plan: Enter a maximum of 950kbps
- NBN25 plan: Enter a maximum of 4950kbps
- NBN50 plan: Enter a maximum of 19500kbps
- NBN100 plan: Enter a maximum of 19500kbps*
- NBN Superfast plan: Enter a maximum of 24500kbps
- NBN Ultrafast plan: Enter a maximum of 49500kbps
*Note: Business NBN100 plans and some legacy residential NBN100 plans may need a maximum of 39500kbps instead. -
Save your changes to finish. Here's an example for a Netgear modem:
Here's everything you need to know about the different features available for TPG Voice, a VoIP phone service that works over the internet.
Note: TPG Voice doesn't have a voicemail feature.
Select one of the links below to jump to a query:
CLID Blocking (Silent Number)
Calling Line ID (CLID) Blocking may also be known as Silent Number to former landline users. It blocks your phone number from being shown to the person you’re calling.
CLID Blocking is turned off by default.
-
Log in to My Account and choose your VoIP service under Select service to manage.
Never logged into My Account before? Check out An Introduction to My Account. -
Hit Settings.
-
Use the switch to turn CLID Blocking on or off. Changes are saved automatically.
Tip: While CLID Blocking is turned on, you can turn it off for a single call by dialing *65 before the phone number.
Call Barring
Call Barring stops your TPG Voice service from making specific types of calls.
All Call Barring types are turned off by default, but you have these options:
- Bar outgoing long distance (STD) calls
- Bar outgoing calls to Australian mobile phones
- Bar outgoing International calls
-
Log in to My Account and choose your VoIP service under Select service to manage.
Never logged into My Account before? Check out An Introduction to My Account. -
Hit Settings.
-
Use the switches to turn each type of Call Barring on or off. Changes are saved automatically.
Call Forwarding/Diverting
Call Forwarding lets you divert calls to TPG Voice number to a different phone number. Standard rates apply for all forwarded calls.
All Call Forwarding/Diverting types are turned off by default, but you have these options:
- Forward calls always
- Forward calls when your number is busy
- Forward calls when calls to your number aren't answered
-
Log in to My Account and choose your VoIP service under Select service to manage.
Never logged into My Account before? Check out An Introduction to My Account. -
Hit Settings.
-
Use the switches to turn each type of Call Forwarding on or off.
-
If you're turning any type of Call Forwarding on, enter the destination phone number and hit Update to save.
Call Waiting
If someone calls you while you’re already on a call, Call Waiting lets you to put them on hold.
Call Waiting is turned on by default and currently, it can't be turned off in My Account. If you’d like to turn off Call Waiting, please call us on 13 14 23.
- While on a call, you’ll hear a tone when there is another call waiting. To switch back and forth between the two calls, press the CALL button on your phone and then dial 2.
- To hang up on the person you’re currently speaking to and switch to the other caller, press the CALL button on your handset and then dial 1.
Call Return
Please note that dialling *69 won't work on TPG Voice services.
However, phones with a built-in Call Return function will work. Standard rates apply for all calls.
Here's what you need to know about TPG billing.
Select one of the links below to jump to a query:
- Your TPG billing period
- How to check your billing period date
- All TPG services are prepaid
- What happens if you change your TPG plan
- What happens if you cancel your TPG service
- How to update your payment details
- Credits
- Refunds
Your TPG billing period
When your first TPG service is activated, that date will be the start of your billing period.
Your monthly plan will renew around that same date each month.
How to check your billing period date
The Billing Period is listed at the top of each TPG invoice:
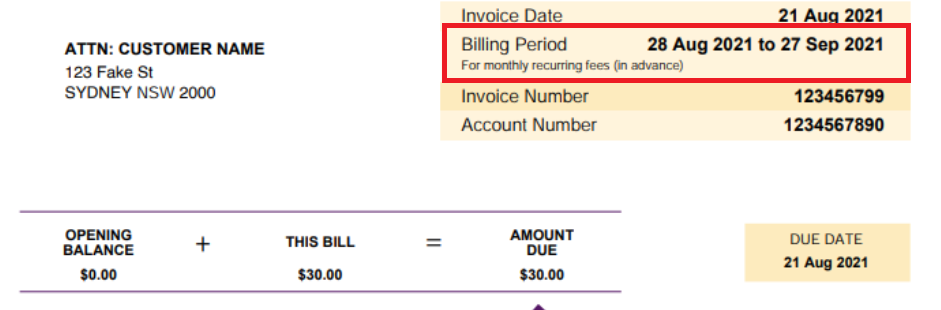
All TPG services are prepaid
A prepayment for one month's plan fees is taken when your order a TPG service.
Your recurring plan fees are paid one month in advance. Payment is taken 7 days before your next billing period begins - this means there's enough time to fix a failed payment, if it happens.
For more info, check out the the Billing Policy in our Service Description and Terms.
What happens if you change your TPG plan
If you change your TPG plan, your new plan will take effect at the start of your next billing period. This means your billing period doesn't change and you don't have to worry about invoice alignments or partial monthly fees.
What happens if you cancel your TPG service
If you still have other TPG services on your account, any plan fees paid in advanced for your cancelled service will be applied as a credit on your TPG account, to be used towards future invoices.
If you're closing your TPG account and have no other TPG services, any remaining credit after your final invoice can be refunded back to your nominated bank account or credit card.
How to update your payment details
Check out Update your Payment Details in My Account.
Credits
A credit is an amount of money added to your TPG account, usually to correct a billing error or to cover downtime during a service fault.
Credits stay on your TPG account until they're used towards charges on your next TPG invoice. For example, if your TPG account had a credit of $50 and your next TPG invoice was due for $59.99, you'd only have to pay $9.99 after the credit is used.
Refunds
A refund is when a credit on your TPG account is returned to your nominated bank account or credit card. You can ask for a credit on your TPG account to be refunded by calling us on 13 14 23.
If you close your TPG account and your final invoice is in credit, the credit will be refunded.
If you can't make your nbn appointment, you can reschedule for a later date online.
-
Go to https://www.tpg.com.au/install and enter your TPG Username to check your current appointment.
You'll find your username on emails from us about your nbn order.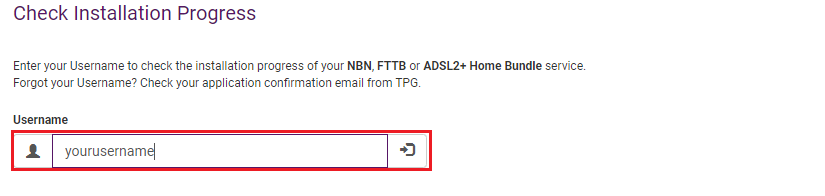
- Hit Reschedule Appointment, then enter the Postcode of your billing address and hit Submit.
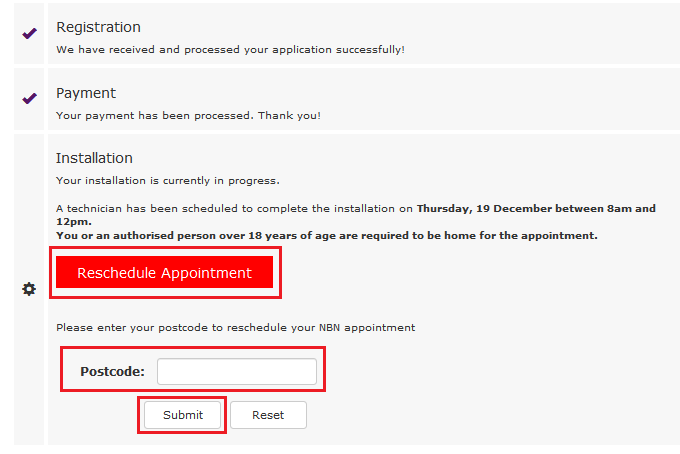
-
Choose your new appointment time and hit Reschedule Appointment.
We'll also send you an SMS and email with your new appointment time.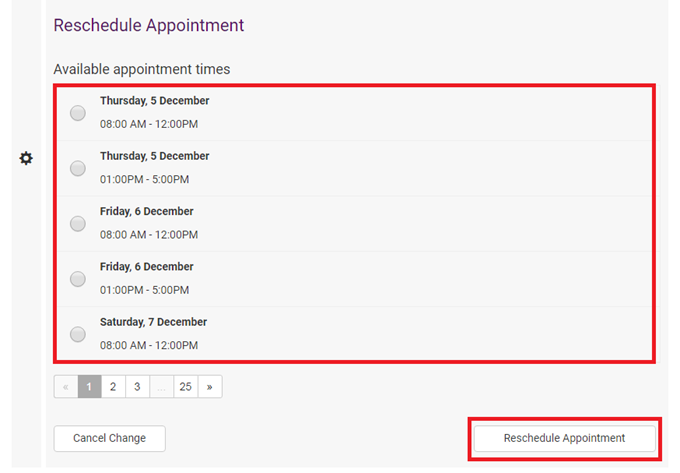
Checking the status lights on your Network Termination Units (NTU) for TPG FTTB can be useful for troubleshooting.
Not every TPG Fibre service has an NTU.
Choose your NTU model:
 |
Adtran® 422G F.Fast NTU |
 |
|
 |
Adtran® 422G Gfast NTU Status lights
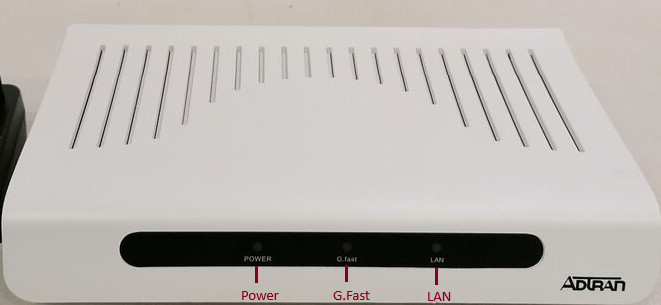
| Light | State | Meaning | |
| POWER | Off | No power. | |
| Green | Your NTU has power. | ||
| GFAST | Flashing green | Make sure the phone cable between your NTU and phone socket is plugged in securely, and restart your NTU. Please call us on 1300 997 274 if the light stays flashing. Note: You must use the supplied 1-metre phone cable. Longer phone cables can cause connection issues. |
|
| Green | Your NTU is operating normally. | ||
| LAN | Off | Make sure the Ethernet cable between your NTU and modem is plugged in securely, and restart your NTU. If the light stays off, try a new Ethernet cable. Please call us on 1300 997 274 if the issue persists. | |
| Green | Successful network connection. This light flashes during data transfer. | ||
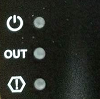
LEA Networks NTU Status lights
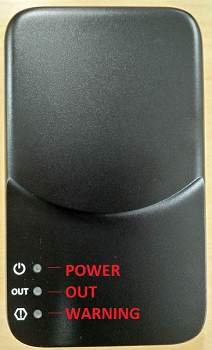
| Light | State | Meaning | |
| POWER | Off | No power. | |
| Green | Your NTU has power. | ||
| OUT | Off | Your NTU isn't detecting the FTTB equipment in the MDF. Please call us on 1300 997 274. | |
| Green | Your NTU is operating normally. | ||
| Flashing green | Line issue detected. Make sure the phone cable between your NTU and phone socket is plugged in securely. Please call us on 1300 997 274 if the issue persists. | ||
| WARNING | Off | Your NTU is operating normally. | |
| Flashing green | Overload detected. Unplug the power cord from the NTU and then plug it back in. Please call us on 1300 997 274 if the issue persists. | ||
Power/DIAG NTU Status lights
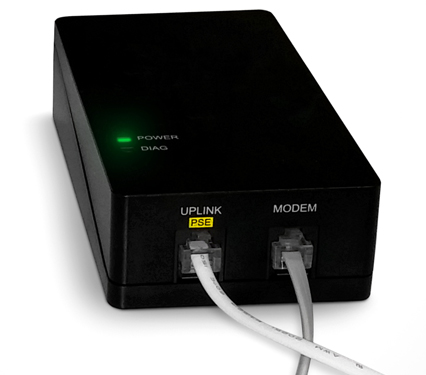
| Light | State | Meaning | |
| POWER | Off | No power. | |
| Green | Your NTU has power. | ||
| Flashing | Your NTU may be malfunctioning. Please call us on 1300 997 274. | ||
| DIAG | Off | Your NTU is operating normally. | |
| Red | Make sure the phone cable between your NTU and phone socket is plugged in securely. If possible, try another 1-metre phone cable. Please call us on 1300 997 274 if this light stays red. | ||
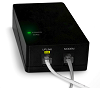
Checking the status lights on your nbn Connection Box (NCB) for nbn FTTC can be useful for troubleshooting.
Note: You may need to slide back the panel to see the status lights.
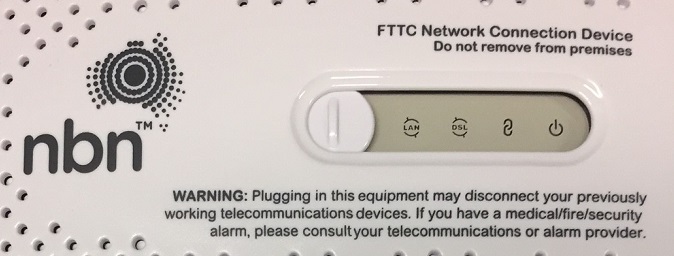
| Light | State | Meaning | |
| LAN | Off | No power. | |
| Blue | Successful connection between your NCB and modem. This light will flash during data transfer. | ||
| Amber | Successful connection between your NCB and modem. This light will flash during data transfer. | ||
| DSL | Off | No connection to the network. | |
| Blue | Successful connection to the network. | ||
| Connection | Off | No power. | |
| Blue | Successful reverse power to outdoor nbn equipment. | ||
| Red | There's an issue with the reverse power. Please call us on 1300 997 271 as we'll need to lodge a ticket with nbn®. | ||
| Power | Off | No power. | |
| Blue | Your NCB has power. | ||